Web HostingBudget-friendly shared hosting plans
 Domains SearchFrom .com to unique country domains, explore and register extensions worldwide.
 WordPress HostingPower your blog or business with WordPress hosting.
 Email HostingSimple, secure email hosting that helps you stay connected and professional.
 Reseller HostingStart your own hosting business with easy and reliable reseller hosting plans.
 AffiliateJoin our affiliate program and earn commissions every time you bring in new customers.
 cPanel HostingHosting powered by cPanel, the world’s most user-friendly control panel.
 Windows HostingBuilt for Windows applications and websites
 IN Domain PricesDon’t miss out on the best domain deals in India!
 WHOIS LookupFind out who owns a domain name with a quick and easy WHOIS search.
 .Com DomainGet the most trusted domain for worldwide credibility
 All TldsSearch and register domain extensions worldwide.
 VPS HostingPowerful virtual servers. Full root access. Reliable uptime.
 Managed VPS HostingNot a tech expert? Choose our fully managed VPS service.
 Dedicated ServersTake full power and total control of your own physical server.
Last updated on March 6th, 2024 at 08:26 am
In 2020, Shopify stores saw an unprecedented surge in demand from customers around the world; up to 457 million people purchased products from a Shopify store.
With this new trend of e-commerce and online shopping in India, the question arises: How can you get started with your own Shopify store?
This article will provide step-by-step instructions for setting up a successful Shopify store in India.
Follow these steps to start selling products online and make money from the comfort of your home.
What is Shopify?
Shopify is an eCommerce platform enabling users to create and manage online stores.
Comes with a comprehensive suite of tools for creating, managing, and customizing an online store in India.
And you can integrate your store with popular payment methods such as Stripe or Paypal and collect payments automatically.
Why Shopify?
Unlike other eCommerce platforms in India, Shopify allows you to design custom storefronts with themes and plugins and customize your website’s look without knowledge of HTML/CSS coding.
And since marketing is everything, you have access to a variety of marketing tools, such as email campaigns, affiliate programs, discount codes, product reviews, and more.
Shopify also comes with real-time analytics that provides insights into sales performance so they can make informed decisions about how best to promote their products and services.
And when you run into issues, you can reach them anytime.
Shopify provides 24/7 customer support to ensure that store owners get the help they need when it’s needed most.
Related: WooCommerce In India: How To Create An Online Store
Preparation – How to get started with the Shopify store setup in India?
Shopify is a powerful and easy-to-use eCommerce platform that can help entrepreneurs in India start their own stores.
However, you must take care of some things before starting a Shopify store in India.
a. Prerequisites
First and foremost, you must pay attention to the laws and regulations for businesses in India.
This includes registering the business with the Ministry of Corporate Affairs (MCA) as well as obtaining any necessary licenses from local or state authorities.
You also need to register for Goods and Services Tax (GST), depending on the products you plan to sell.
Don’t forget to register your business name.
In addition to legal requirements, you should ensure you have adequate financial resources before.
The startup costs will cover things like marketing and Shopify monthly payments.
b. Research your niche
This is something most people ignore. And it later comes to haunt them.
In itself, a niche is an area that focuses on specific products or services for a particular market.
Think of it this way; a niche helps you avoid selling everything to everyone (and not selling anything at all).
Instead, it focuses your shop on a specific market, which helps point your efforts and resources to building a successful online store with targeted sales.
That’s how you grow fast!
Before researching your niche, think about what type of product or service you would like to offer on your Shopify store in India.
Consider what makes the products unique and how they can benefit customers in India.
After determining the type of product or service, you want to offer, research potential niches by looking at other stores selling similar items and analyzing their success rate.
This is called competitor research.
Doing this helps you identify your strengths and weakness, the things you can use to build a successful Shopify store in India.
That said, here are some of the most profitable Shopify niches in India;
1. Fashion
2. Jewelry
3. Health and fitness
4. Grooming
5. Electronics
6. Car Accessories
7. Kitchen knives
8. Pet toys
9. Bluetooth speakers
10. Gaming headsets
11. Smartwatches
12. Skincare products
13. Teeth whitening
14. Mini golf
15. Beard oil
16. Portable chargers
17. Luxury goods
While I am not encouraging you to pick from this list, it is here to keep your creative juice flowing.
Go through the list and get inspired!
c. Choose a domain name
Get the difference between your business name and the domain name.
While they differ, they are all essential when building a Shopify store in India.
The domain is the web address customers use to access your store.
Just like the business name, your domain should be memorable, easy to spell, and relevant to your business.
For example, if your store is for Car accessories, the name should be something carkits.co.in.
It ticks all the boxes we mentioned above; short, relevant, and definitely memorable.
Besides the above, choose one that includes either your business’s exact or abbreviated name, followed by “.in” – the extension used for Indian websites.
The ‘.in’ extension is reserved for websites/stores targeting Indian audiences!
This is to say, if you are planning on selling only to the Indian audience, you should go with the .in extension.
Otherwise, consider other extensions, such as .store, .com, and .shopping.
Once you’ve brainstormed several potential names, check their availability on registrar sites like Truehost.co.in or Namecheap.
While at it, avoid using special characters or hyphens in the domain name.
Why?
It makes it difficult for customers to remember and type correctly into their browsers.
And that’s why we insist on a shorter domain.
Setting Up Your Shopify Store in India
Now that you’ve taken care of the essentials, let’s get down to business.
a. Choosing the right Shopify plan
While Shopify offers a 3-day free trial, you will have to pick a perfect plan for your eCommerce business.
The right plan will give you access to all the features and services you need while providing a budget-friendly option that suits your store’s size and needs.
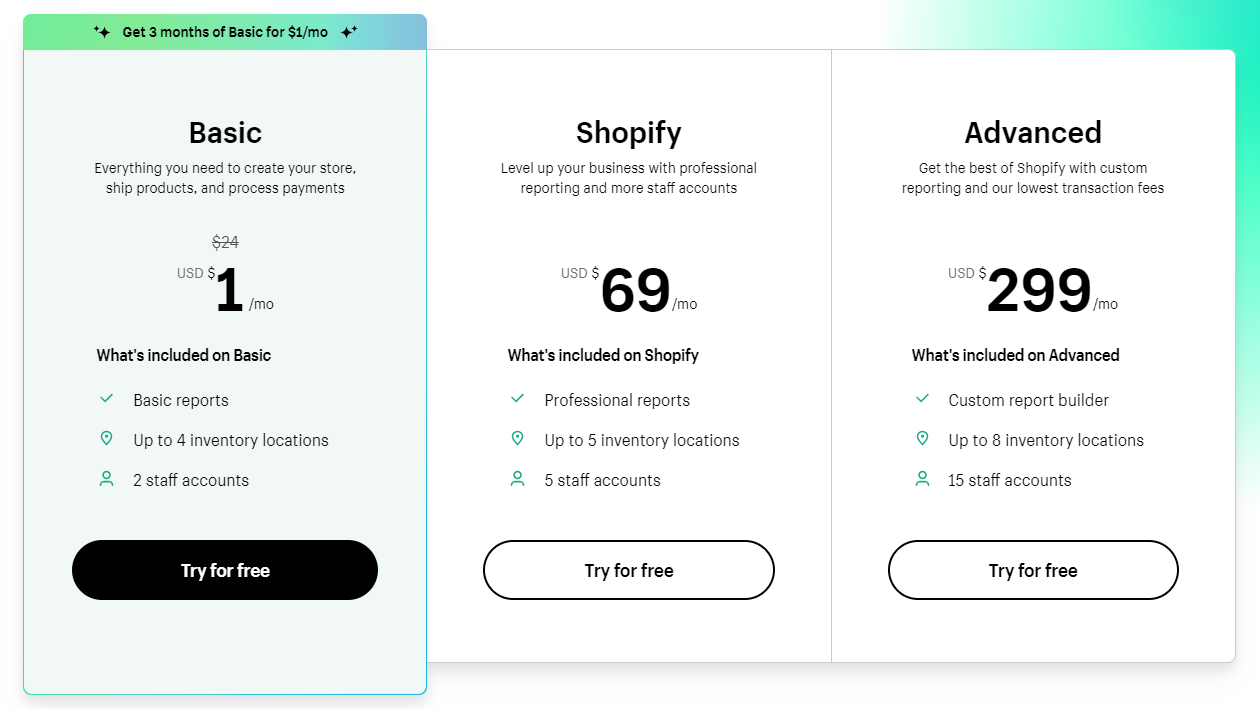
That said, three main Shopify plans – Basic Shopify, Advanced, and Shopify Plus – are designed to meet different business needs.
- Basic Shopify Plan: This is a great way to start your Shopify store in India. It provides you with all the features necessary to create an online store at a very affordable price of only $1 per month. This plan allows you to list up to two staff accounts and up to four inventory locations. With this plan, you can accept payments through credit cards, Apple Pay, PayPal, and more. You also have access to basic reports which will help you analyze your customers’ buying behavior and track your sales performance. Additionally, the basic Shopify plan supports digital products such as PDFs or music downloads and one-click refunds.
- Shopify Plan: Enjoy monthly fees of $69, including up to 5 staff accounts. Comes with professional reports which help track your sales and customer data, so you can make more informed decisions about how best to optimize your store. It also provides access to fraud analysis tools and real-time shipping rates, ensuring customers get their products quickly and safely.
- Advanced Plan: This is the most comprehensive plan for those looking to start their own Shopify store in India. For just $299 per month, users can enjoy 15 staff accounts and a custom report builder. This lets business owners easily track and analyze their performance with detailed insights into customer trends, sales figures, and more.
- Shopify Plus Plan: The Shopify Plus plan is an all-in-one solution for high-volume businesses that need a more advanced eCommerce platform. It offers faster checkout with Shop Pay and the ability to manage up to 10 stores from one central location. This plan also provides access to exclusive enterprise features such as automated fraud protection and a dedicated customer success manager. The monthly fee for the Shopify Plus plan starts at USD 2,000 per month, which is why it is marketed for bigger businesses. Shopify Plus allows merchants to scale their operations quickly and easily without worrying about technical limitations or system performance issues. Merchants can also take advantage of hundreds of apps created specifically for high-volume stores.
When selecting a Shopify plan, consider factors such as;
- The number of products you wish to sell
- Whether or not you need advanced features like gift cards or abandoned cart recovery and
- If it integrates with any other third-party tools.
You should also consider how much storage and bandwidth your store requires for its daily operations.
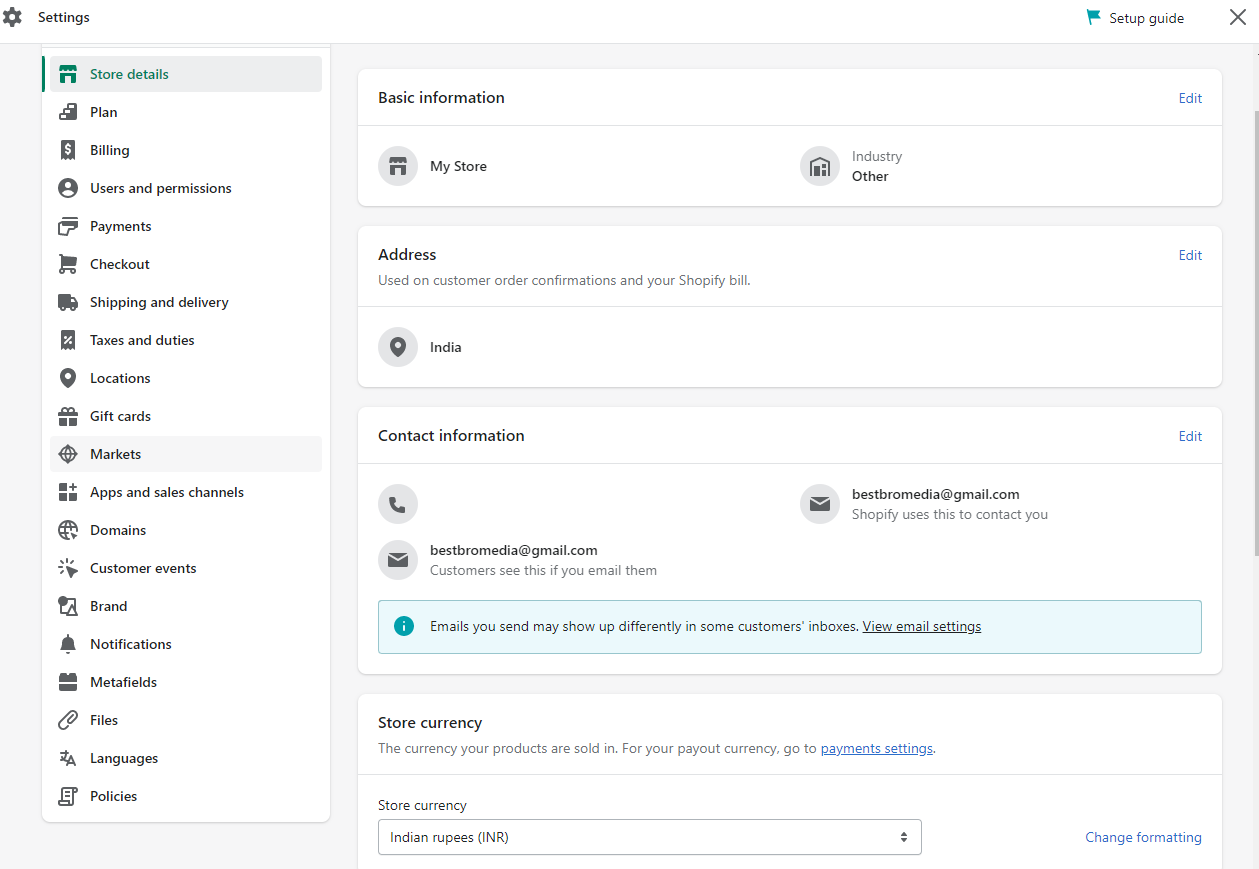
b. Create an account
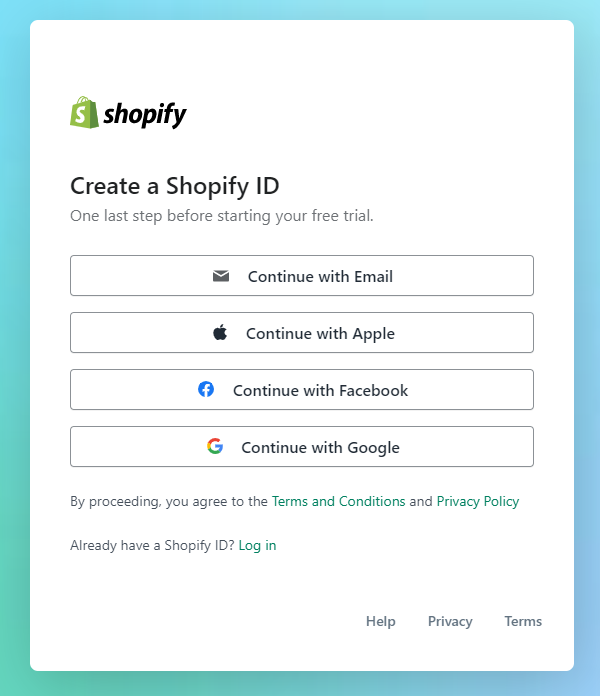
To create an account, you will need to sign up with your email address and choose a password.
After signing up, you’ll be prompted to enter basic information about yourself and your business.
This includes the name of your store, country, currency, language preferences, and payment gateway details.
You’ll also need to provide a physical address for shipping purposes and verify some information by providing copies of documents such as PAN cards or Aadhar card numbers for Indian stores.
Once this has been completed successfully, you can begin setting up your Shopify store.
c. Pick a Theme for Your Store
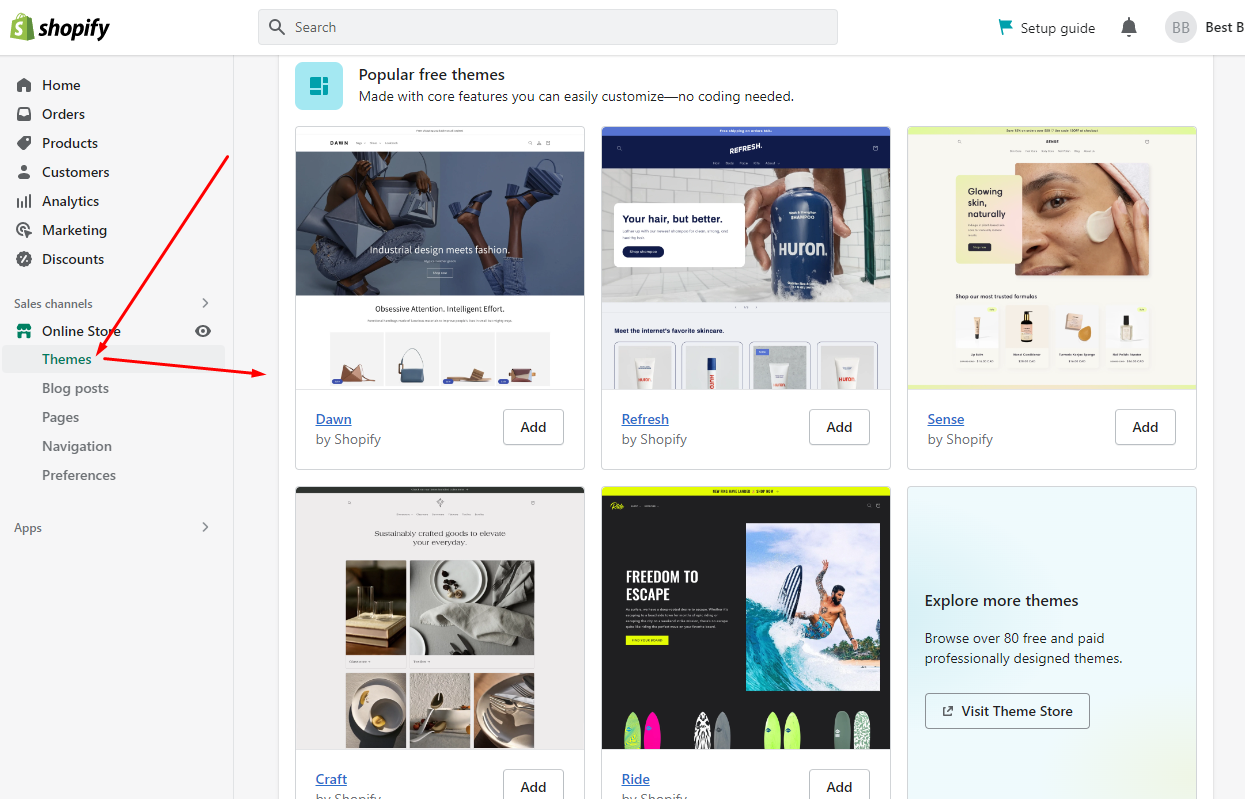
An attractive and well-organized store will help attract customers and make it easier for them to find what they want.
To create a professional-looking design, you should take the time to plan out your store’s layout, theme, and branding before getting started.
When designing your Shopify store in India, consider the end-user experience first.
Think about how people will interact with your website and what features they need to navigate through it easily.
Some essential elements include product images and descriptions, payment options, shipping information, and contact details.
Additionally, ensure that you have a clear navigation structure so that customers can quickly find the products they are looking for without getting lost on the page.
d. Customize Store Settings
Once you have chosen a theme for your Shopify store, the next step is to customize it.
This is to ensure that it looks professional and presentable to customers.
Begin by working on the theme you selected in the previous step.
Here, you can change elements such as fonts, colors, and layouts to meet your brand’s preferences and style.
Next, add a logo for your store, which can be uploaded directly from Shopify’s dashboard or via an FTP client through their website.
This logo should be easily recognized by customers so that they know who they are purchasing from when making purchases on your site.
- Add a payment gateway to your store (Shopify Payments, Razorpay, Paypal, etc.)
- Update your shipping information (Add/Delete Shipping Zones, Update Shipping Rates)
- Set your billing information (for Shopify to charge you for your store. You would be charged after the end of your trial).
e. Add Essential Pages to the Store
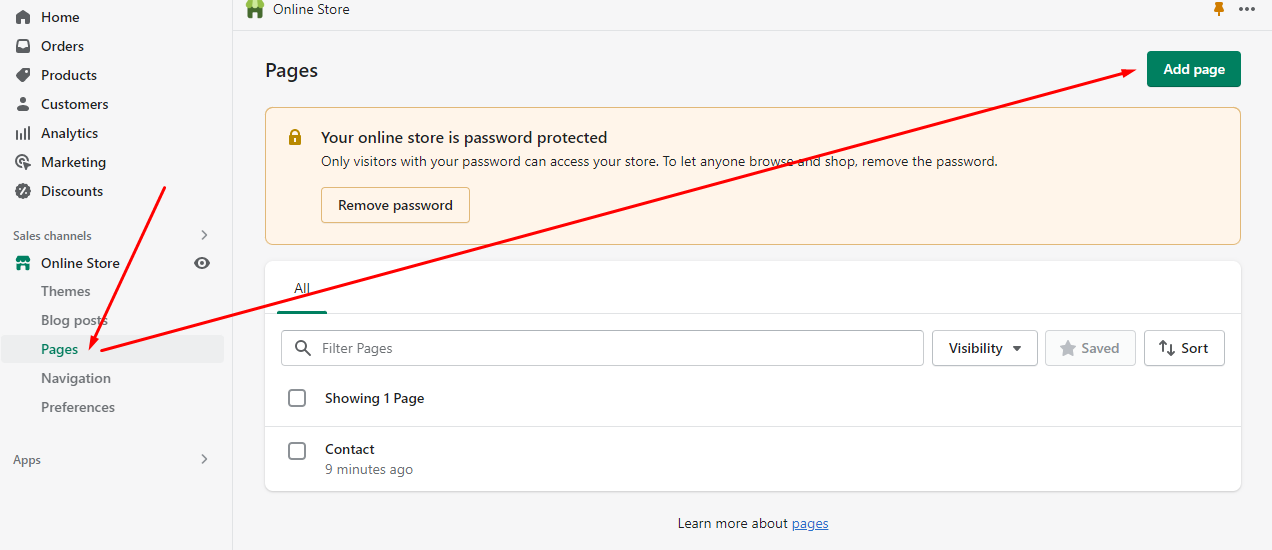
Once the store is set up, it’s time to add essential pages that will inform customers about your business and help them better understand your products.
The first page should be an About Us page that provides information on the history of your business, who runs it, and why you started selling online.
This page can also include a mission or vision statement outlining what values are important to you as a company.
Add photos and videos of the team behind the business to help build trust with potential customers.
The next step is creating a Contact Us page, so customers can easily get in touch if they have any questions or concerns. Aviator game is a popular casino game that involves a player placing a bet before a virtual airplane takes off. The payout amount is determined by how long the airplane stays airborne before crashing. The longer the airplane stays in the air, the more money the player wins. However, if the airplane crashes before the player cashes out their bet, they lose all their winnings.
Include contact details such as a phone number and email address as well as options for live chat support or social media accounts where customers can reach out directly.
Other pages include:
- Terms & Conditions
- Privacy Policy
- Returns Policy
- Shipping & Delivery Information
To create a page with Shopify, click Online Store -> Pages -> Add a Page.
f. Add Products
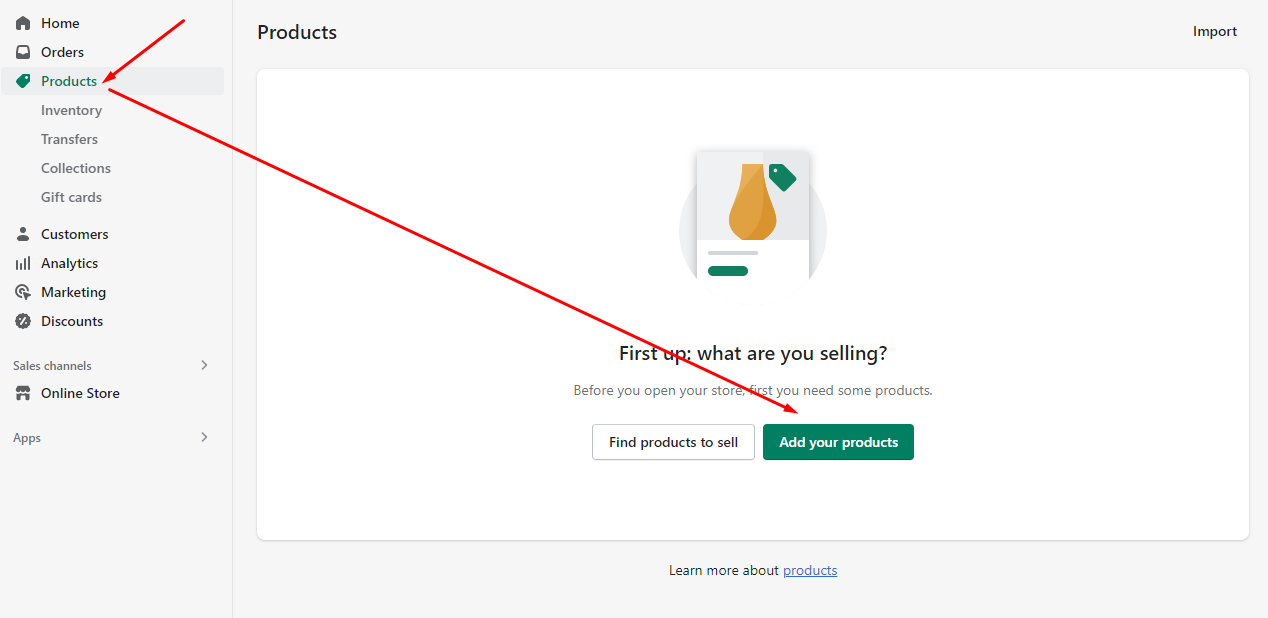
To add products, you first need to create product collections and organize them into categories.
You can then add specific items with detailed information, such as;
- Product Title & Description
- Product Images
- Set Product Type, Vendor, Collections, and Tags
- Set a price
- Inventory Status
- Shipping information
- Variants
- Meta Title & Description for SEO
Once your product collections are created and populated with items, you can begin creating the “Add Products” page on your Shopify store.
This page allows customers to easily browse through all of the products available for sale on your site.
You’ll need to include information about each item, such as its name, image(s), price, options (if any), and quantity available.
Include any special offers or discounts for certain products on this page so that customers can be aware of them before making a purchase decision.
g. Add Shopify Apps to Your Store
Now that your store has products and everything else in order, you can jump directly to promotion.
But before you do, take a minute to look into Shopify App Store.
It is one of the biggest eCommerce app stores and has apps to simplify your store management, marketing, customer relationships, and more.
Inside, you can find helpful apps to add to your store and increase functionality.
- Shopify POS: This app helps sync your online and offline sales, giving customers a seamless experience regardless of their choice of purchase channel.
- Oberlo: is an easy-to-use dropshipping platform that enables users to add products from AliExpress directly into their store’s inventory with just one click!
- MailChimp for Shopify: Create campaigns easily in the MailChimp dashboard and track them within the Shopify orders page as well – Get insights on how successful each campaign was by tracking clicks & opens through this integration
- LoyaltyLion: The ultimate loyalty program tool which rewards points and offers discounts when customers perform certain actions like subscribing or referring friends etc., thus helping build relationships over time while increasing customer retention rates too!
- Abandoned Cart Recovery App: An effective way to follow up on potential leads who have left items in the cart but haven’t completed checkout yet – Send out automated emails reminding these shoppers about what they were browsing through last time so as not forget it altogether!
- Gift Card App: Create special gift cards for your customers to give them the freedom of shopping with ease – This is a great way to encourage repeat purchases & increase customer loyalty!
Marketing Your Store
It is time to get your store noticed.
Considering this is an online business, traffic is all you need to start seeing some results.
a. SEO Strategies
Search Engine Optimization (SEO) is an important part of any online business.
It helps your store to get found more easily by potential customers. You can use many tactics to optimize your Shopify store for SEO in India.
- Optimize your site structure and content for search engines: Ensure that your site’s pages are organized logically and that they include keywords relevant to your products or services.
- Use keyword-rich page titles, meta descriptions, and headings: These elements are used by search engines to understand your pages’ content and display them in search results.
- Use alt tags to describe images: Search engines can’t see images, so they rely on alt tags to understand what’s in them.
- Create high-quality, unique content: Search engines value sites that provide valuable information to users.
- Build backlinks to your site: Backlinks from other reputable sites can help improve your site’s search engine rankings.
- Optimize your product pages for search engines: Make sure that your product pages include detailed descriptions, high-quality images, and customer reviews.
- Use Google Search Console & Google Analytics: Use these tools to track your site’s performance in search results, and to identify any issues that may be affecting your search engine rankings.
- Monitor your competition: Keep an eye on what your competitors are doing, and try to stay ahead of them in terms of SEO.
- Keep your site updated: Regularly updating your site with new content and products can help keep your site fresh in the eyes of search engines.
b. Social Media Strategies
Like SEO, social media is a powerful tool for any online business, and Shopify stores are no exception.
With platforms like Facebook, Instagram, Twitter, and others, your store can reach potential customers not here in India, but also around the world.
To maximize your reach on social media, you need to understand which platforms will work best for your store and how to use them effectively.
Start by creating accounts on the main social networks relevant to your niche market.
Once you have an account set up, create a content strategy that includes regularly scheduled posts such as promotional material from your store or engaging content related to your industry.
Make sure to include images and videos when possible to increase engagement with followers.
Engage with users by responding promptly to comments or messages – this will help build trust in your brand and create loyalty among customers.
Other strategies to consider:
- Develop a content calendar: Plan out your content in advance, and schedule it to go live at the best times for engagement.
- Create visually appealing content: Use high-quality images and videos to make your content more engaging and shareable.
- Utilize Influencers: Partner with influencers in your niche to reach a larger audience and gain credibility.
- Use hashtags: Use relevant hashtags to help your content get discovered by users who are interested in your products or services.
- Host giveaways and contests: Hosting giveaways and contests can help increase engagement and build a community around your brand.
c. Email Marketing Strategies
Did you know that the average ROI through email marketing is $36 for every $1 spent?
Yes, that means email can be the breakthrough to growing your Shopify store in India.
Here, you can use emails to build customer relationships, promote products and services, inform customers of sales and deals, and keep them up-to-date on relevant news.
Here are some strategies you can implement for successful email marketing campaigns:
Start by creating an email list of your customers’ contact information. Make sure to collect names, email addresses, phone numbers, or any other information you may need later.
Once you have the list ready, create attractive newsletters and promotional emails showcasing products from your store.
Include calls to action in these emails to encourage readers to take action and buy something from your store.
Also, make sure to personalize the content according to individual customer preferences such as age group or gender – this will help increase engagement with the message
d. Paid Advertising Strategies
While free advertising methods work, paid can be the sure way to increase brand awareness, target potential customers and drive sales.
One popular form of paid advertising used by Shopify stores is search engine marketing (SEM).
With SEM, your business pays for advertisements that appear on the search engine results page (SERP) when specific keywords related to your products are searched for.
This helps ensure visibility for your store and drives targeted traffic directly to the products or services you offer.
Not forgetting social media campaigns.
They provide another great way to reach potential customers through sponsored posts and ads on platforms such as Facebook, Instagram, and YouTube.
And in all the campaigns, creating attractive visuals and a compelling copy should be the rule.
It helps a lot to drive customers toward a conversion.
Finally, display ads can be utilized on websites to create more exposure for your store.
Related: How To Start An Online Business In India With No Money
Final Thoughts
The process of setting up a Shopify store in India can be overwhelming.
But by following the steps outlined in this article, you can create a successful and profitable Indian e-commerce venture.
Before taking the plunge into starting an online business on Shopify, research the laws and regulations that apply to online stores in India.
DO NOT assume you don’t need any registrations since it’s an online business!
While at it, read through Shopify’s terms of service before signing up. This is your chance to know all fees incurred when using their services.
Lastly, remember that having an online presence is only one part of running a successful store.
As such, investing time and effort into promoting your shop should not be overlooked if you want to maximize revenue.
Take advantage of social media marketing platforms such as Facebook and Instagram Ads to reach potential customers.
Read also; WooCommerce Dropshipping in India Blueprint