Web HostingBudget-friendly shared hosting plans
 Domains SearchFrom .com to unique country domains, explore and register extensions worldwide.
 WordPress HostingPower your blog or business with WordPress hosting.
 Email HostingSimple, secure email hosting that helps you stay connected and professional.
 Reseller HostingStart your own hosting business with easy and reliable reseller hosting plans.
 AffiliateJoin our affiliate program and earn commissions every time you bring in new customers.
 cPanel HostingHosting powered by cPanel, the world’s most user-friendly control panel.
 Windows HostingBuilt for Windows applications and websites
 IN Domain PricesDon’t miss out on the best domain deals in India!
 WHOIS LookupFind out who owns a domain name with a quick and easy WHOIS search.
 .Com DomainGet the most trusted domain for worldwide credibility
 All TldsSearch and register domain extensions worldwide.
 VPS HostingPowerful virtual servers. Full root access. Reliable uptime.
 Managed VPS HostingNot a tech expert? Choose our fully managed VPS service.
 Dedicated ServersTake full power and total control of your own physical server.
Starting a website can feel expensive.
One minute you’re excited about starting a blog, launching a business, or building your portfolio.
The next, you’re staring at domain prices, hosting plans, and add-ons you don’t fully understand.
Everything seems necessary. Everything seems to cost extra.
It’s frustrating, especially when all you want is a simple, working website without draining your wallet.
The good news is there’s a way to do this cheaply and still do it right.
In this guide, I’ll show you exactly how to get the cheapest domain and hosting available right now on Truehost.
Who Is This Guide For?
I wrote this guide for anyone who wants to launch a website without spending a lot up front.
You’ll find it especially helpful if you’re:
- Building an online portfolio to showcase your work
- Looking to launch your first website.
- A blogger or content creator setting up a personal site or niche blog.
- A small business owner or startup testing out a web presence before investing more.
- An entrepreneur launching a side project or MVP who wants low overhead costs.
- A non-profit, community group, or local organization looking for an affordable online presence.
How To Buy the Cheapest Domain and Hosting on Truehost
Follow these steps to buy the cheapest domain and hosting on Truehost. Each one builds on the last, so don’t skip ahead.
Step 1) Go to Truehost
Open your browser and head over to the Truehost India website.
Once you’re on the homepage, take a moment to look around.
The interface is straightforward, so navigation should be easy.

Step 2) Go to Pricing Then Select Cloud Hosting
From the main navigation, click on Pricing and choose Cloud Hosting.
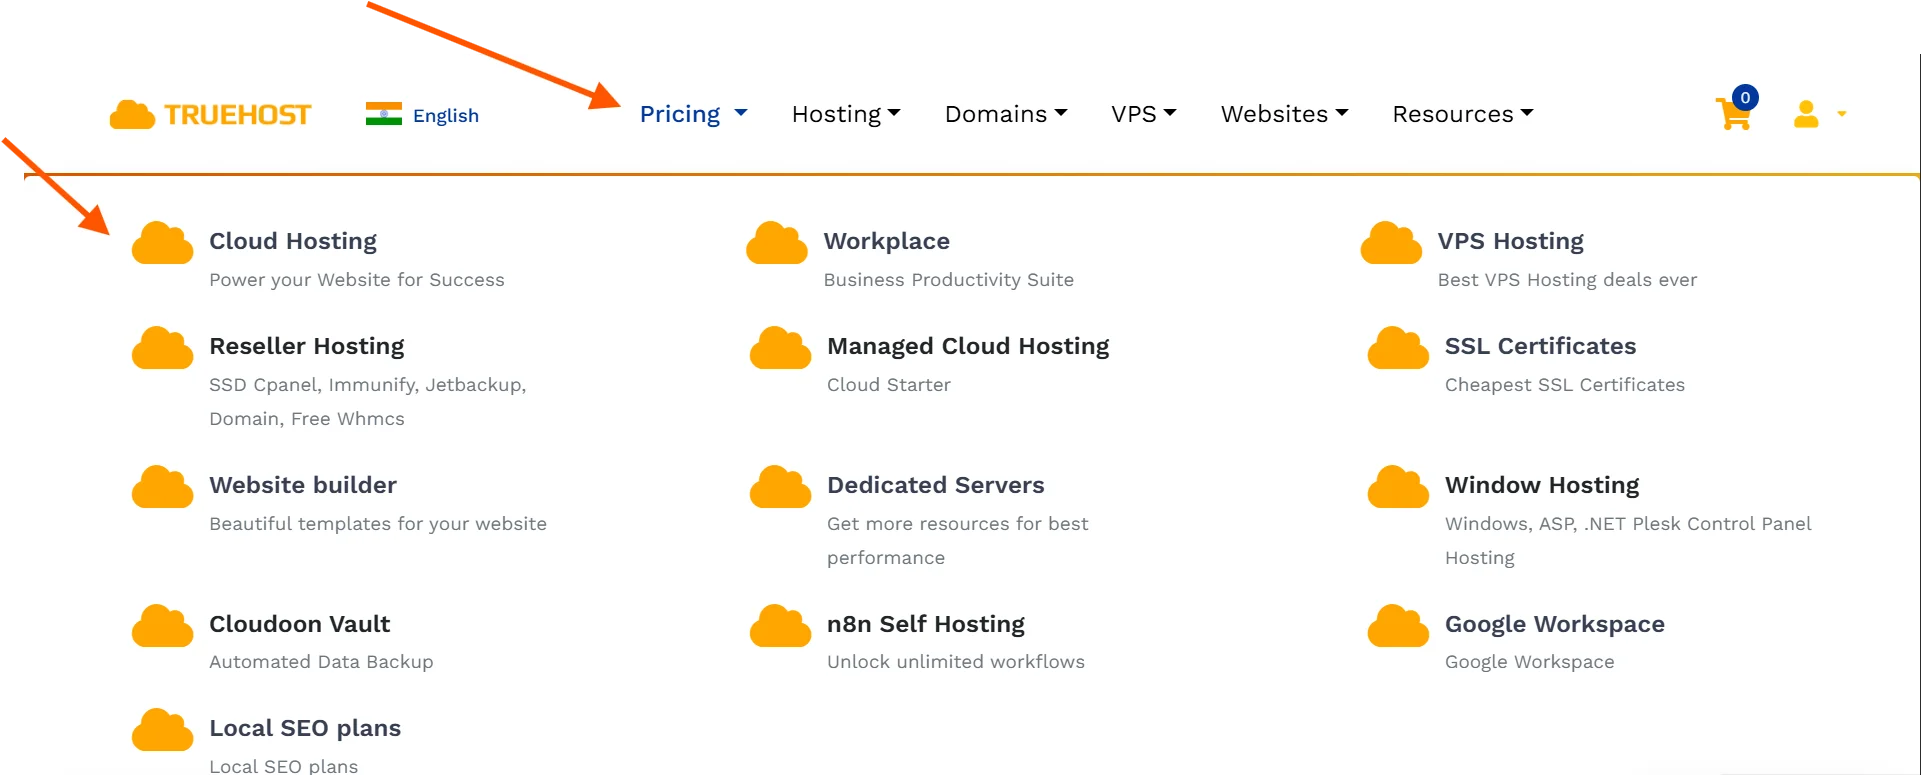
Don’t let the name confuse you. Cloud Hosting on Truehost is essentially the same as standard Shared Hosting.
It simply means your website will share server resources with other sites, which is why the price is low.
It’s perfectly suitable for new or small websites.
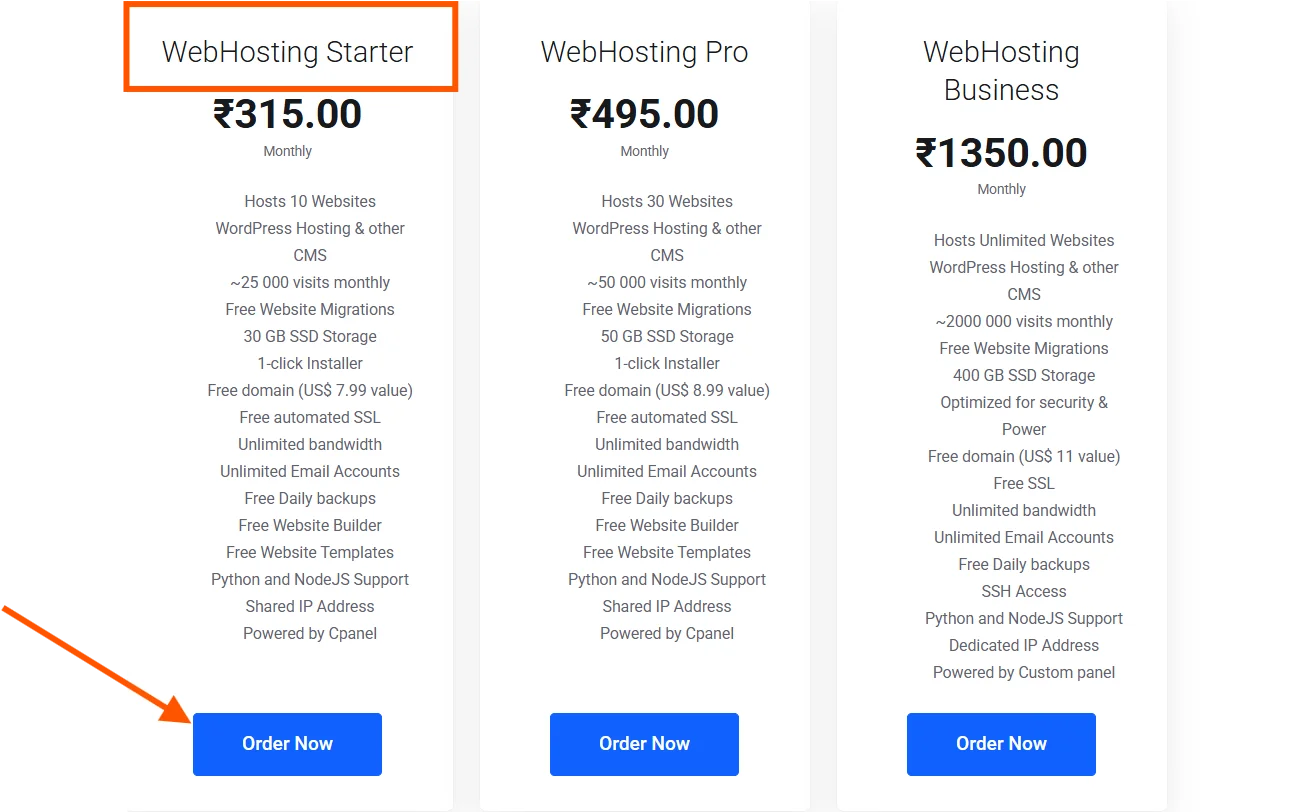
Step 3) Select the Webhosting Starter Plan
You’ll be shown a list of Cloud Hosting plans.
Look for the one labelled Webhosting Starter. This is the most affordable option and is ideal for beginners.
Click the Order Now button on the plan to proceed.
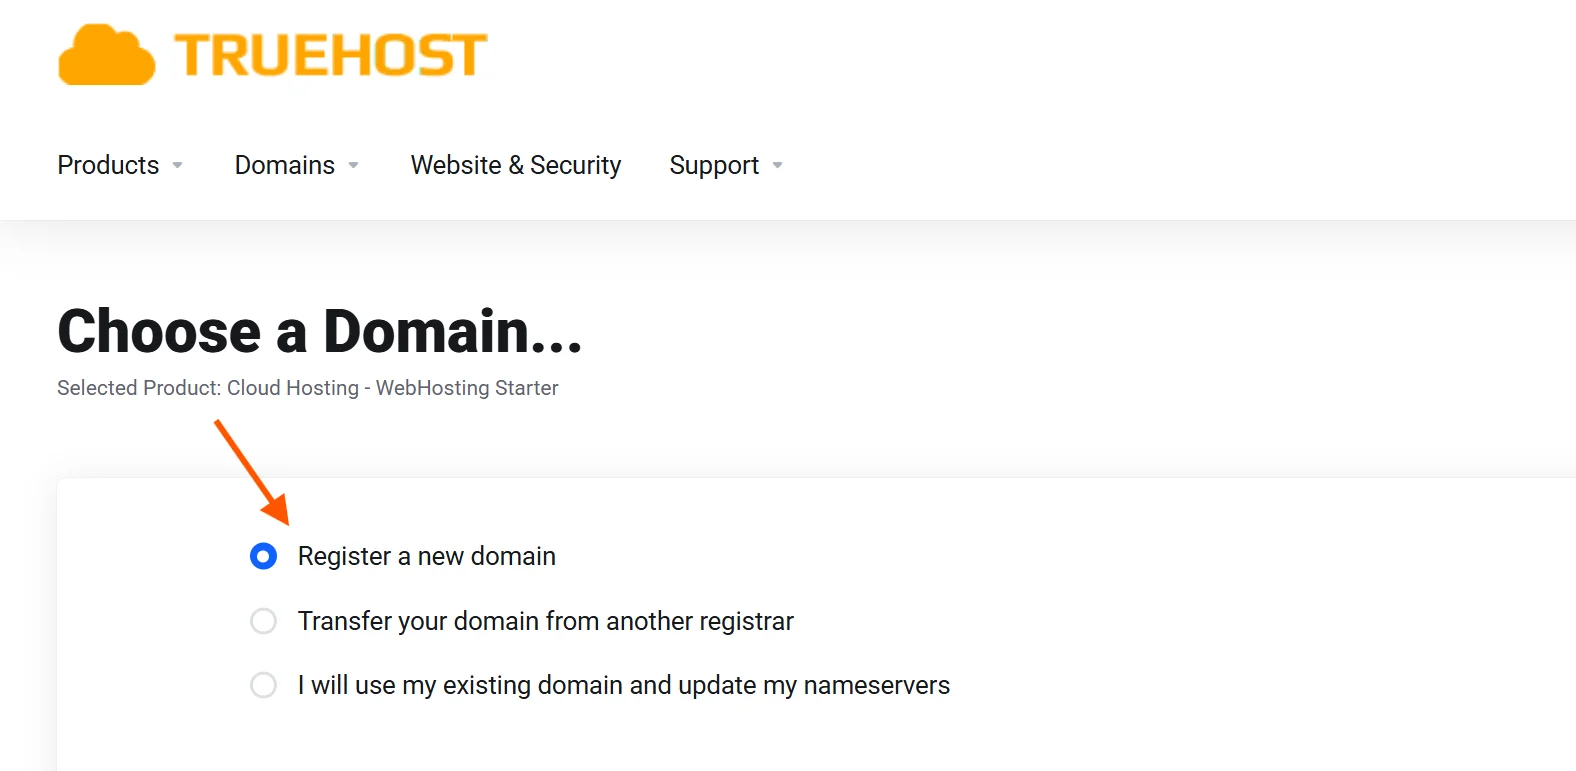
Step 4) Register Your Domain Name
After clicking Order Now, you’ll be taken to a page asking about your domain.
You’ll see three options: register a new domain, transfer an existing domain, or use a domain you already own.
Since we’re starting from scratch, select Register a New Domain.
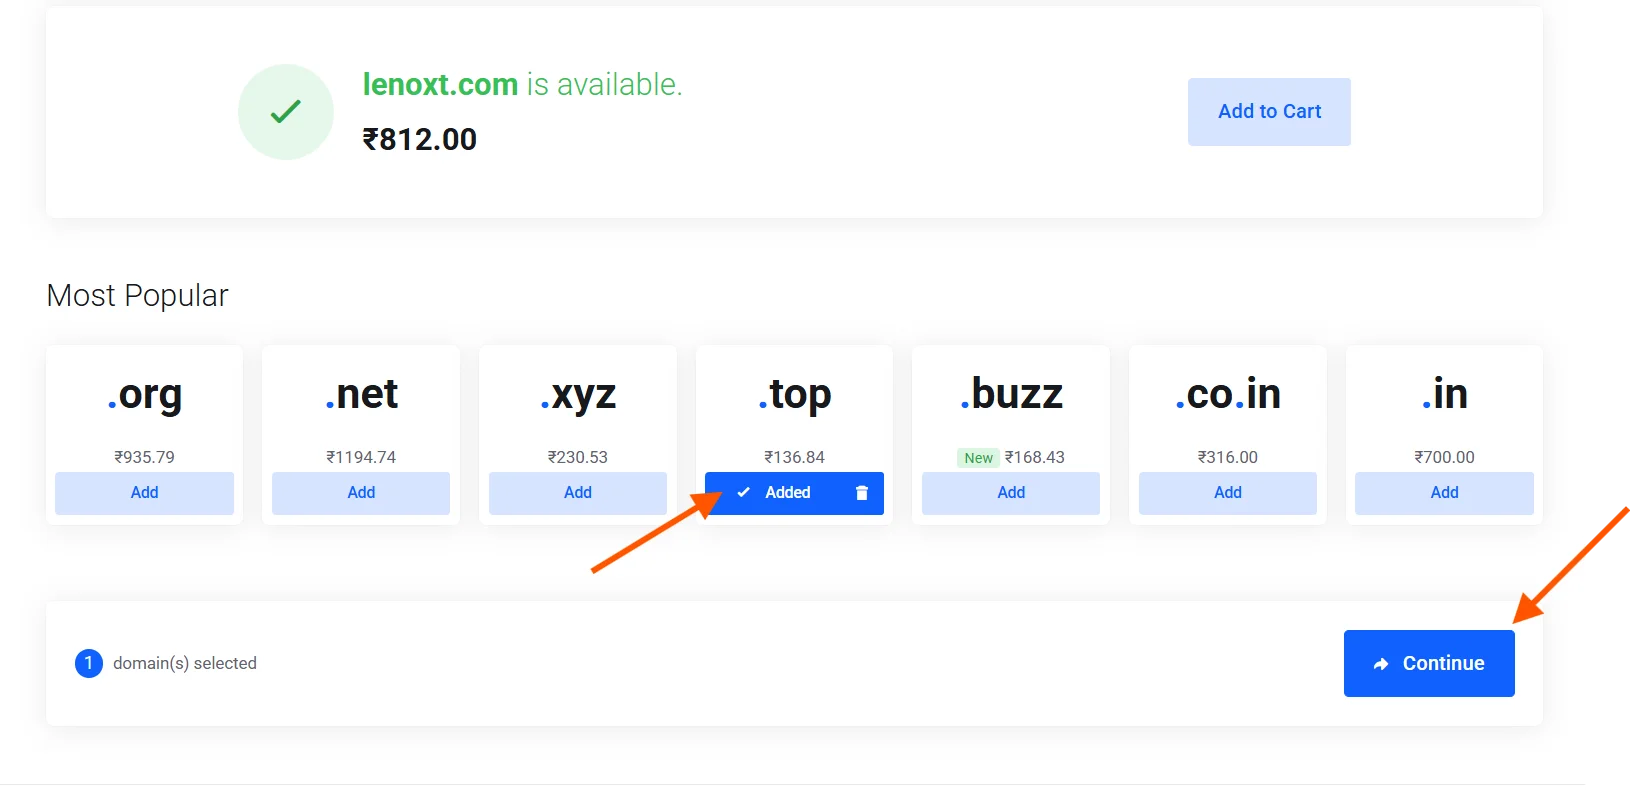
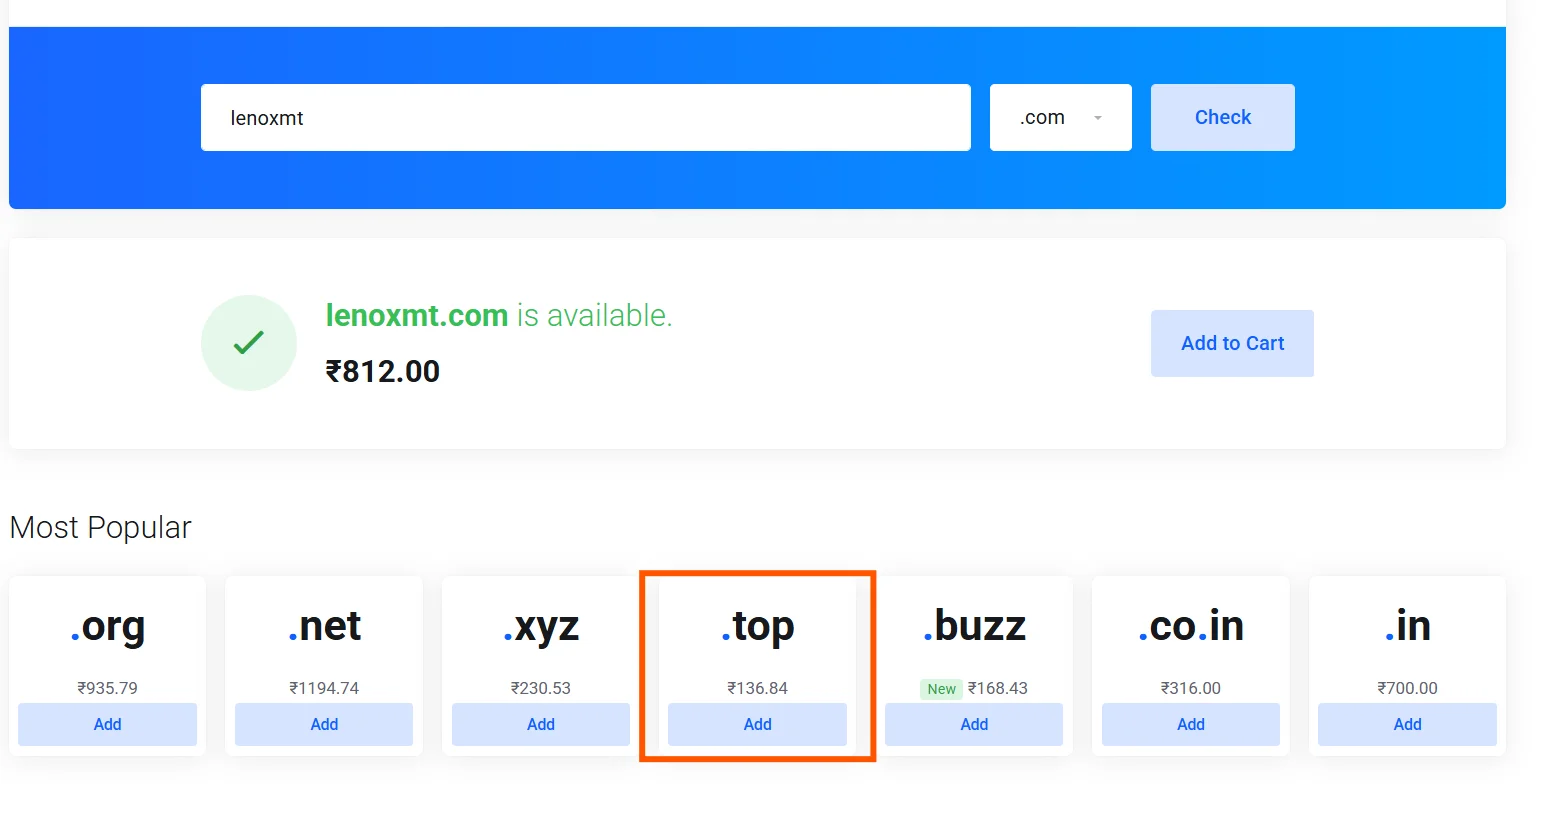
Type the domain name you want in the search box and hit Search.
You’ll see your domain name plus a bunch of different TLDs. A TLD (Top-Level Domain) is the last part of your domain name, located after the final dot.

The cheapest TLD available on Truehost right now is .top.
If your desired domain with .top is available, click Add and then hit Continue.
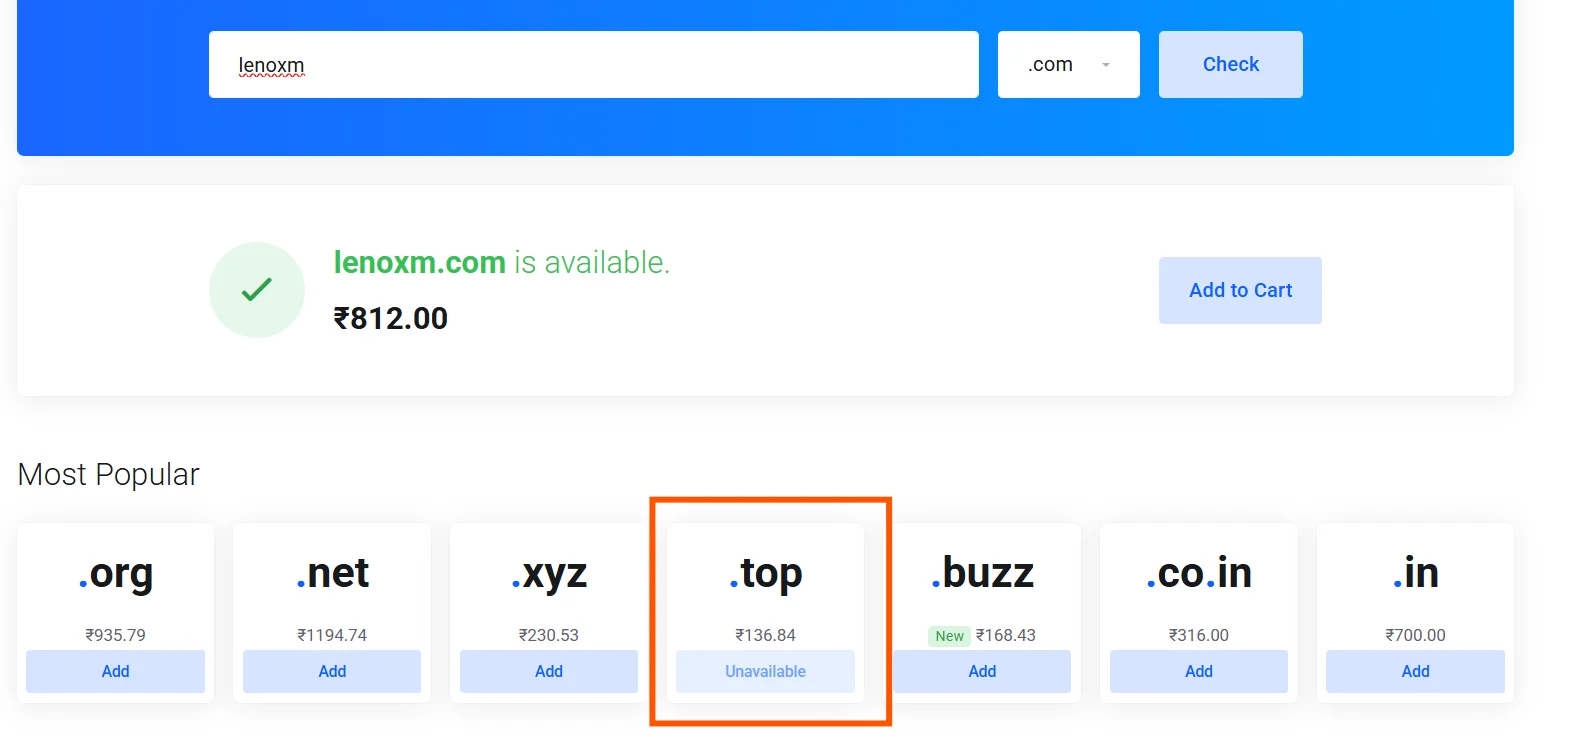
If it’s unavailable and you still want the cheapest option, you may need to tweak your domain name slightly.
Example:
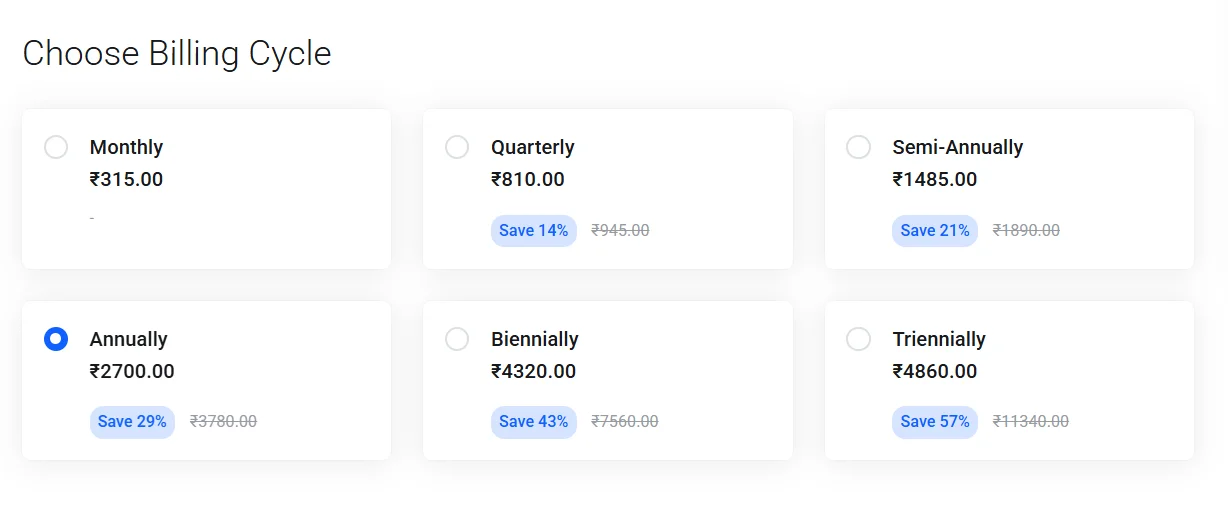
Step 5) Select Your Billing Cycle
After hitting Continue, you’ll be taken to billing.
Here, you’ll be asked to choose how often you want to be billed.
Here’s a quick breakdown of how I think about each of them:
- Monthly: Avoid this if possible. While it has the lowest upfront cost, the per-month rate is the most expensive overall. It’s only worth considering if you’re testing things out and aren’t sure you’ll continue past a month or two.
- Quarterly (every 3 months): A step up from monthly. You pay slightly less per month, but it’s still more expensive in the long run compared to longer billing cycles. Not the best value.
- Semi-Annually (every 6 months): A middle-ground option. You get a modest discount compared to monthly and quarterly billing, but you’ll still pay more per month than if you committed to a full year.
- Annual: The sweet spot for most beginners. You commit to one year and get a noticeably lower monthly rate in return. It’s affordable, not too long a commitment, and gives you enough time to properly build and grow your site.
- Biennial (every 2 years) : A better deal than annual if you’re confident your website is here to stay. The longer commitment unlocks a bigger discount per month.
- Triennial (every 3 years): The best value of all the options. If you’re in it for the long term and have the budget to pay upfront, this gets you the lowest possible monthly rate across the entire plan.
In this case, I’d suggest choosing Annual billing.
Once you select the option you prefer, click Continue.
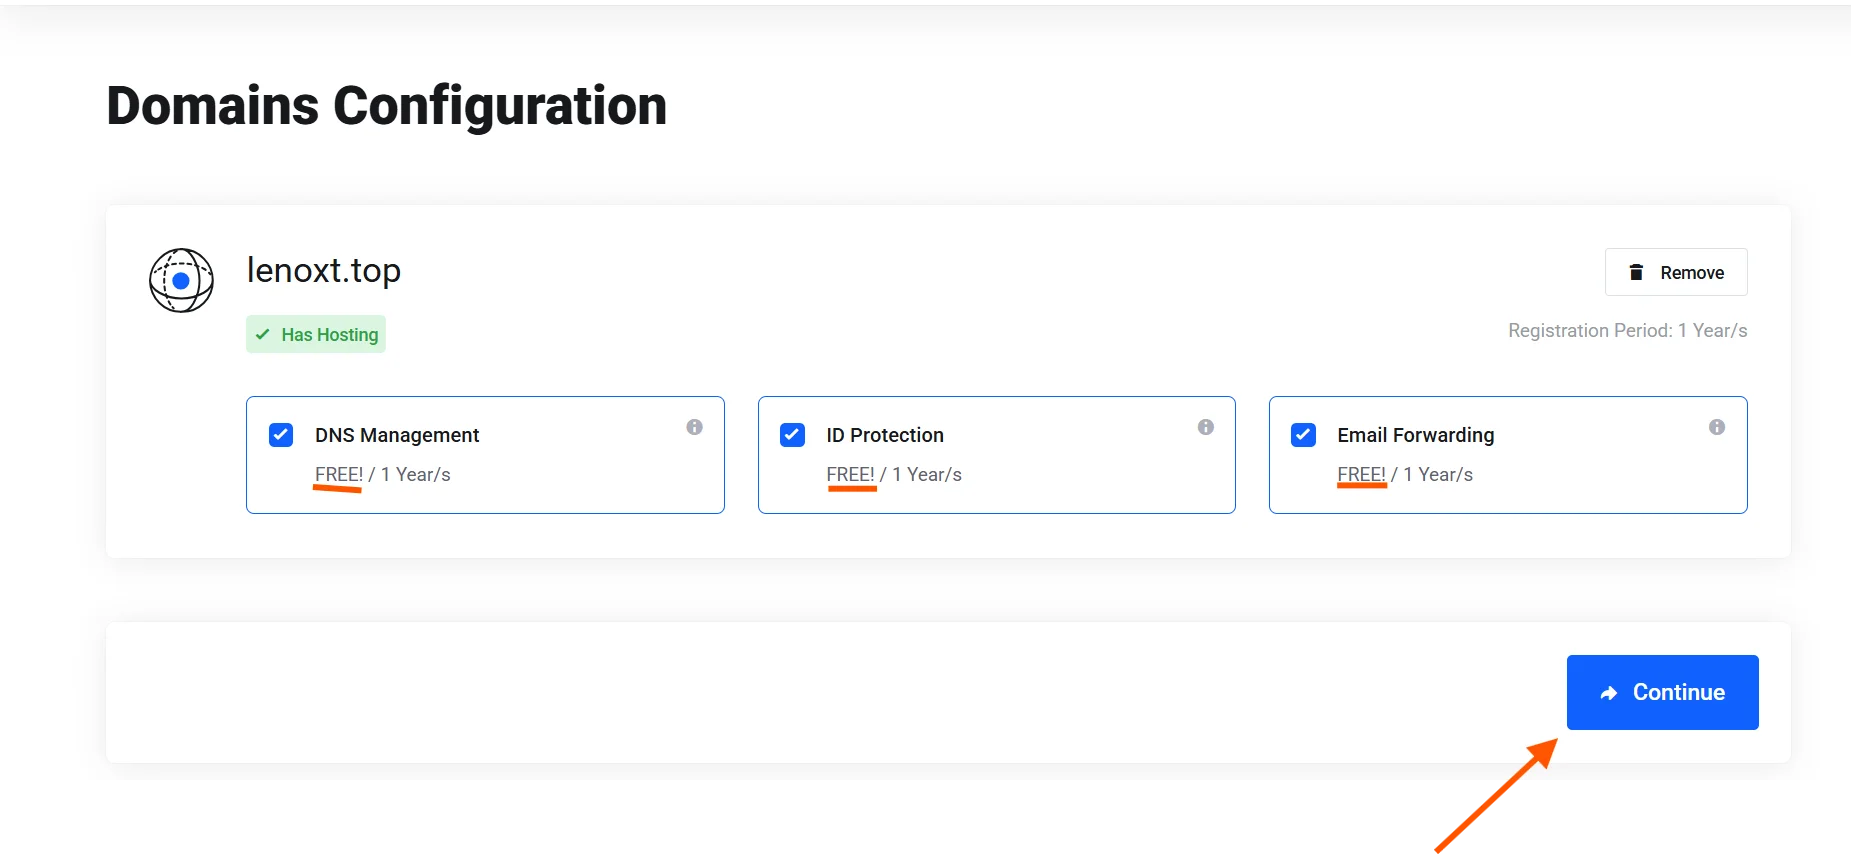
Step 6) Review Add-Ons
The next page will display optional add-ons such as DNS management and ID protection.
Since we’re going for the cheapest possible setup, only select add-ons that are marked as free.
Anything with an extra cost is not necessary to get your site up and running.
Click the checkbox for any free add-on you’d like, then hit Continue.
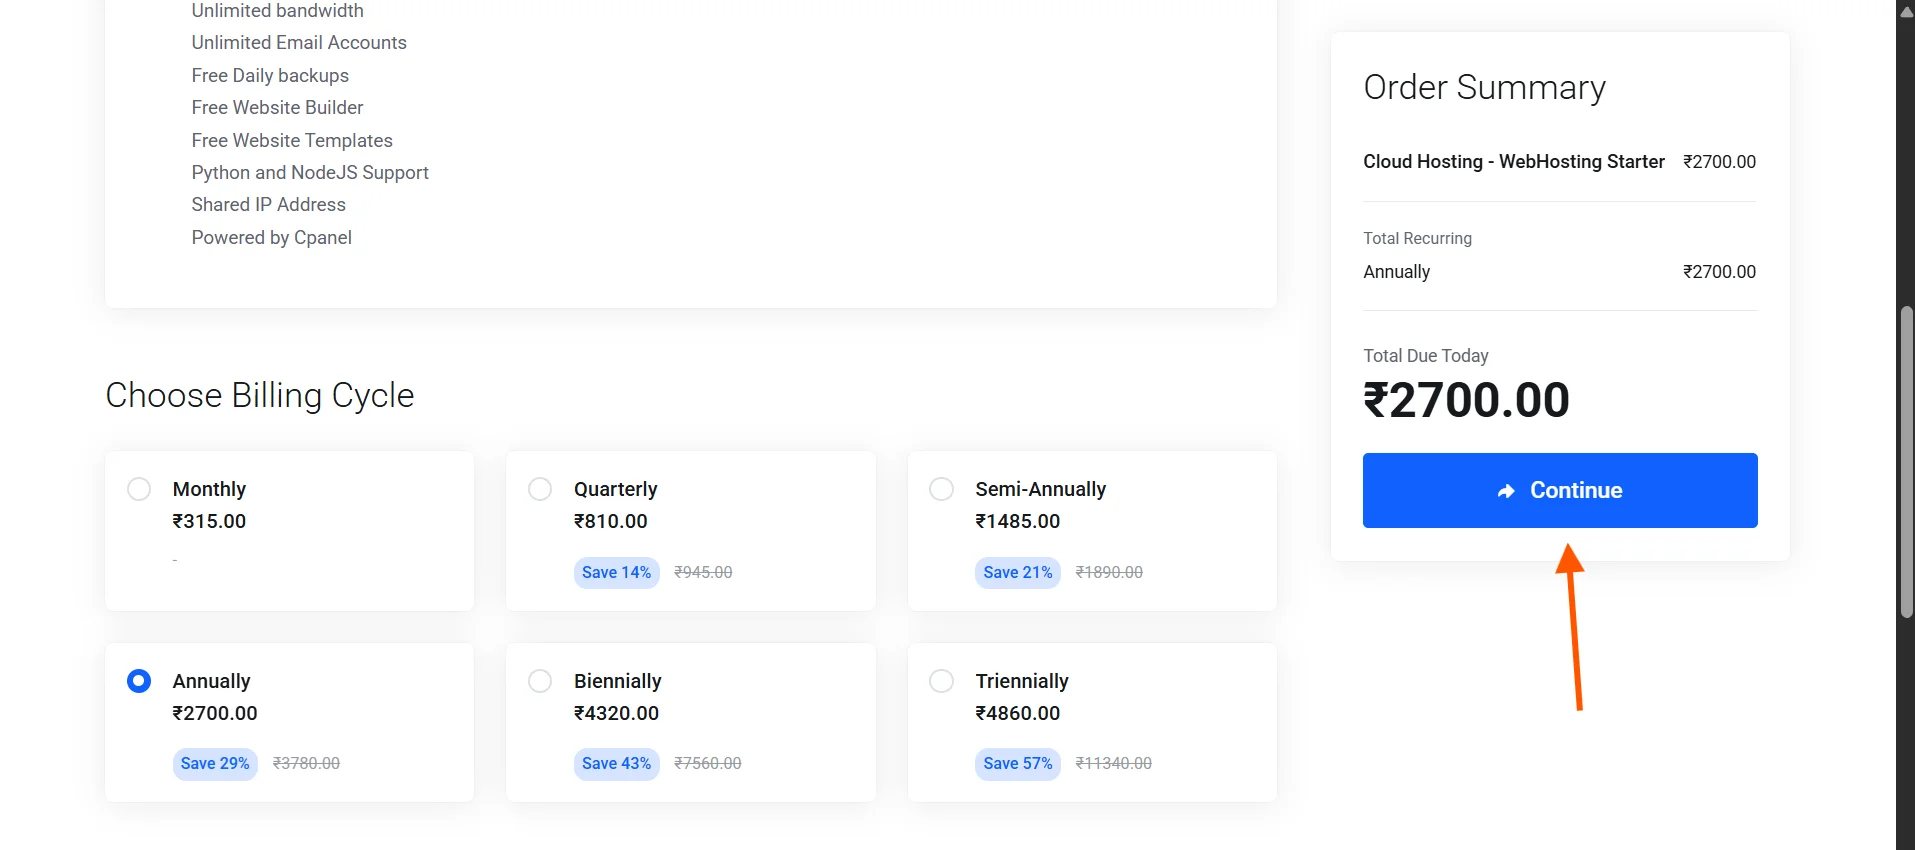
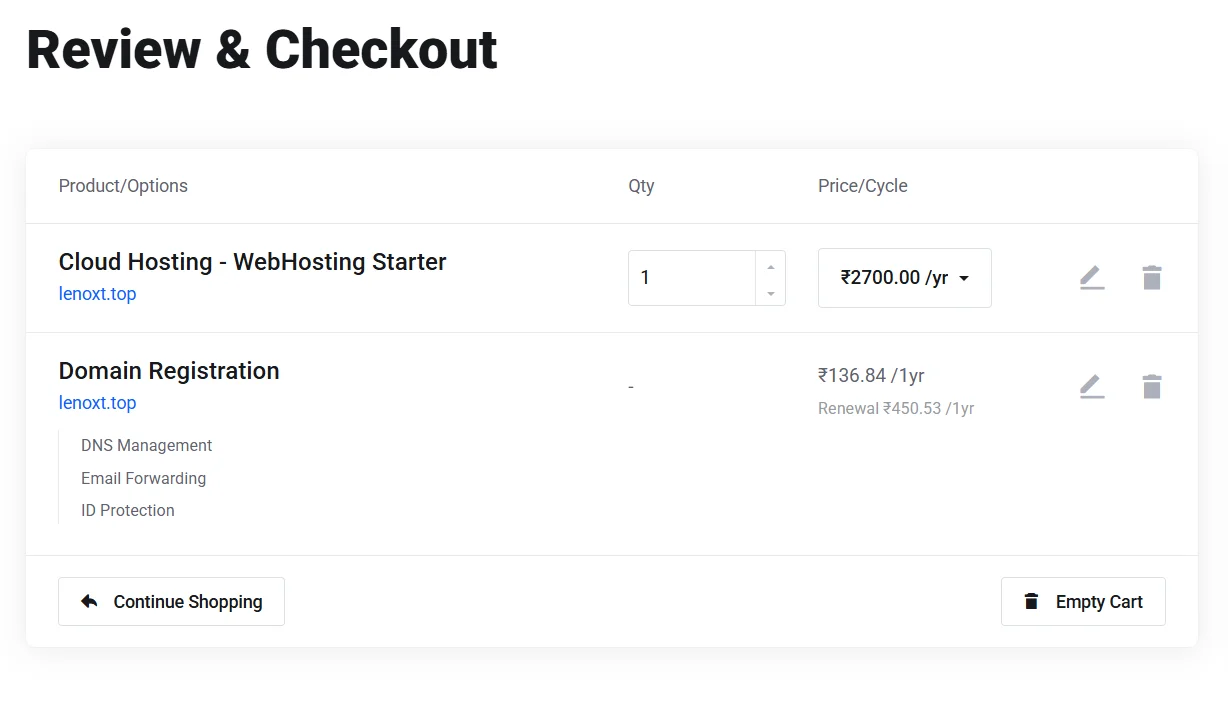
Step 7) Review, Pay, and Confirm
This is the final step.
You’ll be taken to an order review page that shows a full breakdown of charges, including your hosting plan, domain name, billing cycle, and any add-ons.
Go through it carefully to confirm everything is correct.
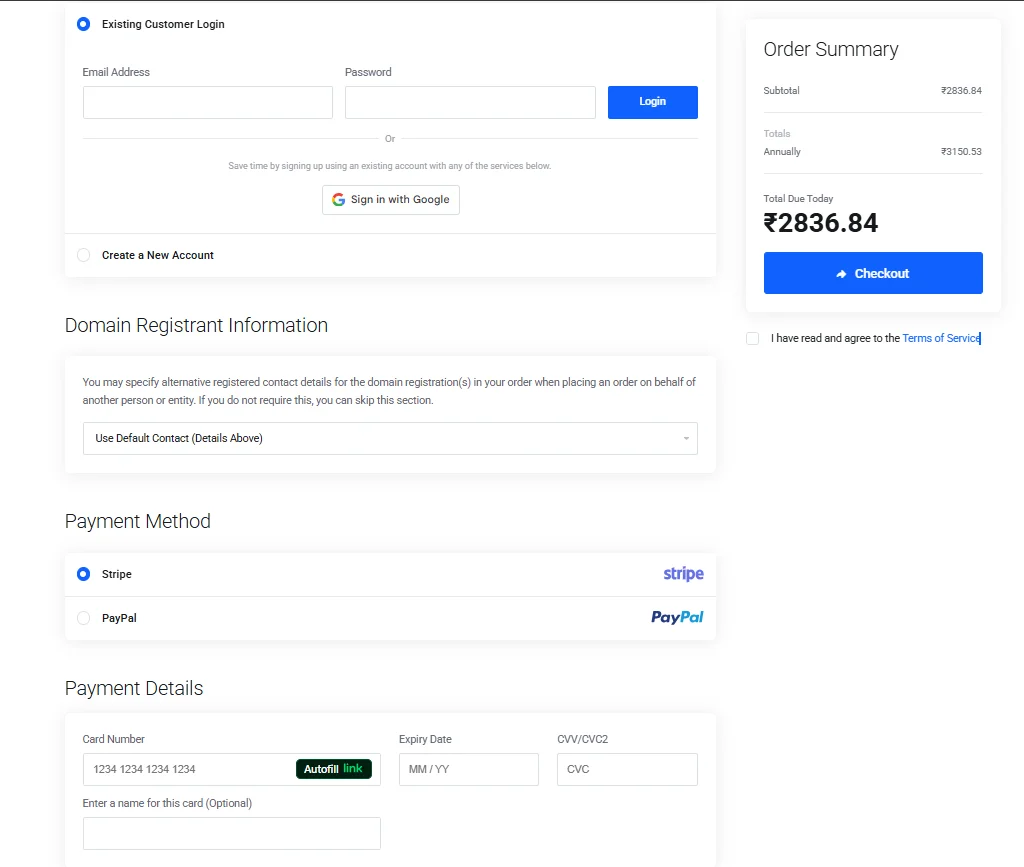
Once you’re satisfied:
- Enter your login info or create an account at Truehost if you don’t have one.
- Fill in your billing information (name, email, address).
- Choose your preferred payment method – Truehost accepts both Stripe (card payments) and PayPal.
- Click Checkout.
- A confirmation prompt will appear; confirm the transaction to complete your purchase.
That’s it.
You now have the cheapest domain and hosting for your website.
You’ll receive a confirmation email with your account details and info on setting up your site.
I’ll cover the next steps in a future article.
What to Consider When Buying a Domain and Hosting
Maybe you’re reading through this guide and thinking that the starter plan and a .top domain might not be right for your situation.
That’s a fair thought.
Perhaps you need more resources, or you want a domain extension that’s more established and recognizable for your industry.
Either way, it’s good to know what to look for before making a final decision.
For domains, consider:
- TLD relevance: While .top is the cheapest, different TLDs carry different impressions. For example: A .in domain signals you’re in India or targeting the Indian market. Choose based on your audience and purpose.
- Brand alignment: Your domain should reflect your brand name or the core space you’re involved in. This helps with recognition and search engine discoverability.
- Renewal pricing: Some TLDs are cheap to register but expensive to renew. Always check the renewal price before committing to a domain.
- Domain history: If you’re buying a domain that was previously owned, check if it was penalized by search engines. For new registrations, this isn’t a concern.
For hosting, consider:
- Storage and bandwidth: The Starter plan is great for small sites, but if you expect to host videos, large image galleries, or high traffic volumes, you’ll want a plan with more storage and bandwidth.
- Number of websites allowed: Some hosting plans only allow one website. If you plan to manage multiple sites, look for plans that support them.
- Uptime guarantee: A reliable host should guarantee at least 99.9% uptime. Downtime means lost visitors and revenue.
- Scalability: As your website grows, you’ll need more resources. Choose a host that lets you upgrade your plan easily without migrating everything.
- Support quality: Good technical support is invaluable when something goes wrong. Look for hosts that offer 24/7 live chat or ticket support.
- Control panel: A user-friendly control panel (like cPanel or a custom dashboard) makes managing your site much easier, especially if you’re not a tech expert.
- Renewal pricing: Some hosting plans are initially cheap but are expensive to renew. Always check the renewal price before committing.
Why Choose Truehost for Your Domain and Website Hosting?
There are many hosting providers out there. So why does Truehost stand out, especially for users in India?
Here are the key reasons:
a) Affordable Plans
Truehost is built with affordability as a core value.
From domain names to hosting plans, our pricing is structured to be accessible to individuals and small businesses who are mindful of their budgets.
You won’t find surprise fees or confusing tiers. What you see is what you pay.
b) Multiple and Easily Scalable Plans
Choosing a hosting plan with Truesthost doesn’t mean you’re locked in it forever.
Upgrading is straightforward, so your hosting can grow alongside your website without any disruption
We offer:
- Shared/Cloud Hosting (3 tiers)
- WordPress Hosting (3 tiers)
- VPS Hosting (Managed and Unmanaged) (3tiers)
- Reseller Hosting (3 tiers)
- Windows Hosting (3 tiers)
- Dedicated Servers (3 tiers)
c) INR Pricing
Another practical advantage for Indian users is that Truehost prices its plans in Indian Rupees (INR).
This means no currency conversion fees and no unpleasant surprises when your bank statement arrives. You know exactly what you’re paying in your local currency.
d) 24/7/365 Technical Support
Whether it’s 3 AM or a public holiday, our support team is always available.
You can reach out via live chat, WhatsApp, email, or call.
e) 99.97% Guaranteed Uptime Backed by SLAs
Truehost guarantees 99.97% uptime.
This isn’t just a marketing claim; it’s backed by Service Level Agreements (SLAs).
This means if your site experiences unexpected downtime, you have formal assurance and recourse.
This level of reliability is critical for any website owner.
f) Fast Load Times Supported by SSDs
Truehost uses Solid State Drives (SSDs) for storage across its hosting plans.
SSDs are significantly faster than traditional hard drives, which directly translates to faster website loading times.
This matters both for user experience and for search engine rankings.
g) Multiple Free Add-Ons
Even on the most basic plan, Truehost offers valuable features at no extra cost.
This includes:
- Free SSL Certificate: Keeps your site secure (HTTPS).
- Free Daily Backups: Your website data is automatically backed up every day, so you can restore it quickly if anything goes wrong.
- Free Website Templates: If you’re not a designer, you can use one of the pre-built templates to get your site looking professional without any coding knowledge.
Get The Cheapest Domain and Hosting Today
Building a website doesn’t have to be expensive.
The steps in this guide are designed to get you one of the most affordable options in India.
Start with the Webhosting Starter plan, grab a .top domain, choose annual billing, and you’ll have everything you need to launch your website.
To get more information or assistance at any step, contact us.