Web HostingBudget-friendly shared hosting plans
 Domains SearchFrom .com to unique country domains, explore and register extensions worldwide.
 WordPress HostingPower your blog or business with WordPress hosting.
 Email HostingSimple, secure email hosting that helps you stay connected and professional.
 Reseller HostingStart your own hosting business with easy and reliable reseller hosting plans.
 AffiliateJoin our affiliate program and earn commissions every time you bring in new customers.
 cPanel HostingHosting powered by cPanel, the world’s most user-friendly control panel.
 Windows HostingBuilt for Windows applications and websites
 IN Domain PricesDon’t miss out on the best domain deals in India!
 WHOIS LookupFind out who owns a domain name with a quick and easy WHOIS search.
 .Com DomainGet the most trusted domain for worldwide credibility
 All TldsSearch and register domain extensions worldwide.
 VPS HostingPowerful virtual servers. Full root access. Reliable uptime.
 Managed VPS HostingNot a tech expert? Choose our fully managed VPS service.
 Dedicated ServersTake full power and total control of your own physical server.
When your website is growing, it is without a doubt that you need to grow with it. You need more resources. Why? So that your website does not crash with the growing traffic.
It is at this point that you need to upgrade your hosting plan. In this guide we will walk you through how to upgrade your hosting plan step by step, the Truehost way.
So, How Do You Upgrade Your Hosting Plan
To upgrade your hosting plan, you have to make sure that you have a hosting plan with us. This is to help you access your Client Area.
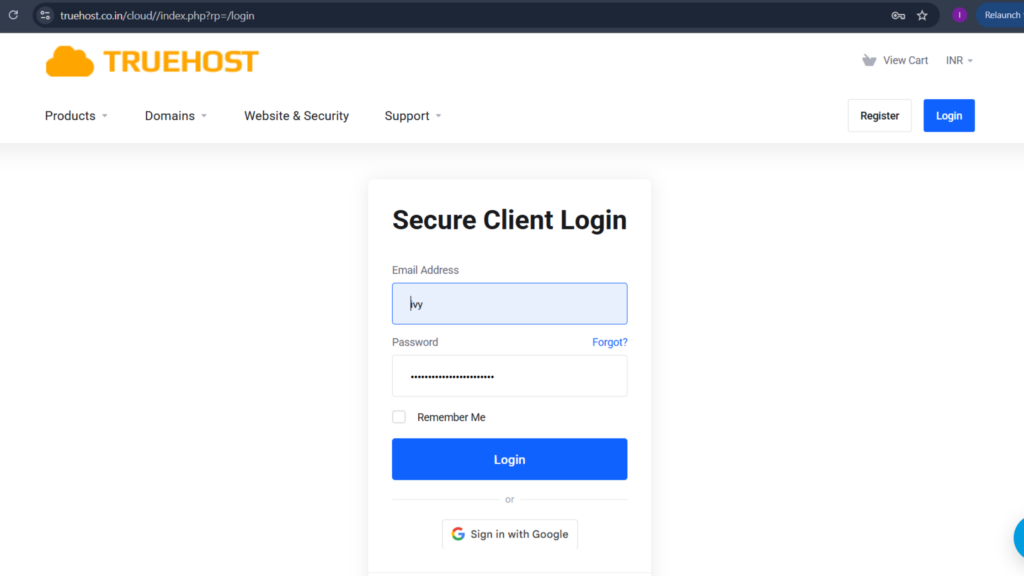
Step 1) Login to Truehost Client Area
The first thing you need to upgrade your hosting plan is to get access to your client area. This is like a command center for managing all your services with Truehost.
For you to log in, follow these steps:
- Open your web browser and navigate to https://truehost.co.in. This lets you access the Truehost portal.
- In the portal look for the “Login” section. This is usually found at the top right part of the homepage.
- Once in the login, enter your email address that you had used to register and the password to now sign in.
What if you forgot your login credentials?
Don’t panic. It is pretty simple. Next to the password entry form, there is a “Forgot?” option. This is a link that you can click and follow the instructions you will be given and your password will be reset. This will allow you to set up a new password and regain access to your account.
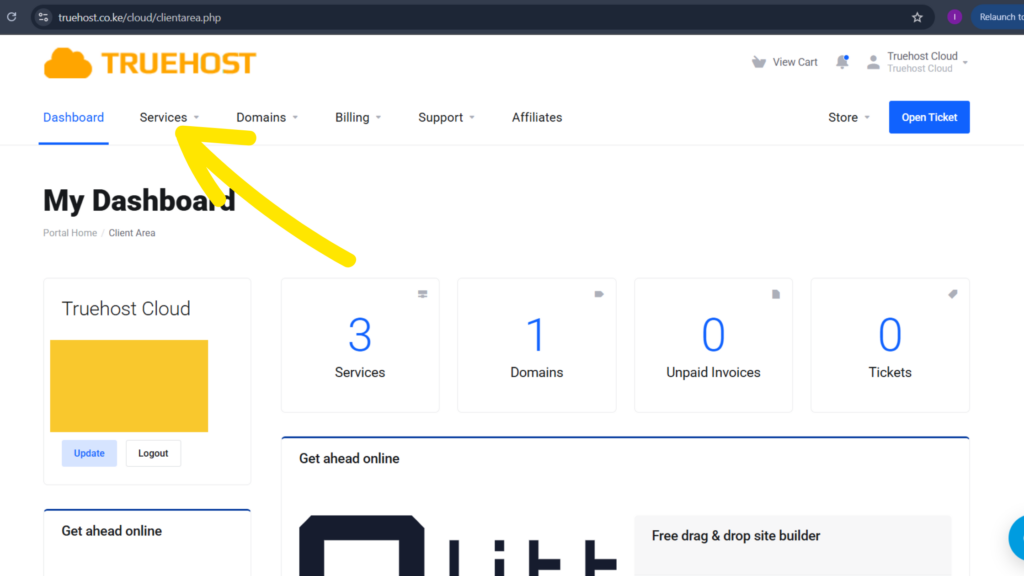
When you are logged in you will be directed to your Client Dashboard. Here, you can see all your active services and hosting packages.
Step 2) Locate Your Hosting Plan
After you have gained access to your dashboard, the next step is to find the specific hosting plan you are looking to upgrade.
You basically do this by:
- From your main dashboard, navigate to the “Services” section. You find it on the top left corner next to the dashboard then click “My Services”.
- When you click on it, a list of all your purchased services will appear, including any shared hosting, VPS hosting or domain related packages.
- From here, you choose the hosting package that you want to upgrade. This is usually tied to your domain name.
- Next to this package you have chosen, you will see an “Actions” section on the left side of the screen. From this section you can see a list of different actions you can take for that particular hosting package. Whether it is login to your cPanel, login to your Webmail, changing your password, Upgrade/Downgrade, renew service and requesting cancellation.
This page gives you a summary of your current hosting plan. This includes the name of the plan whether Bronze, Silver, Gold, your resource limits, and your billing cycle.
Step 3) Initiate the Upgrade
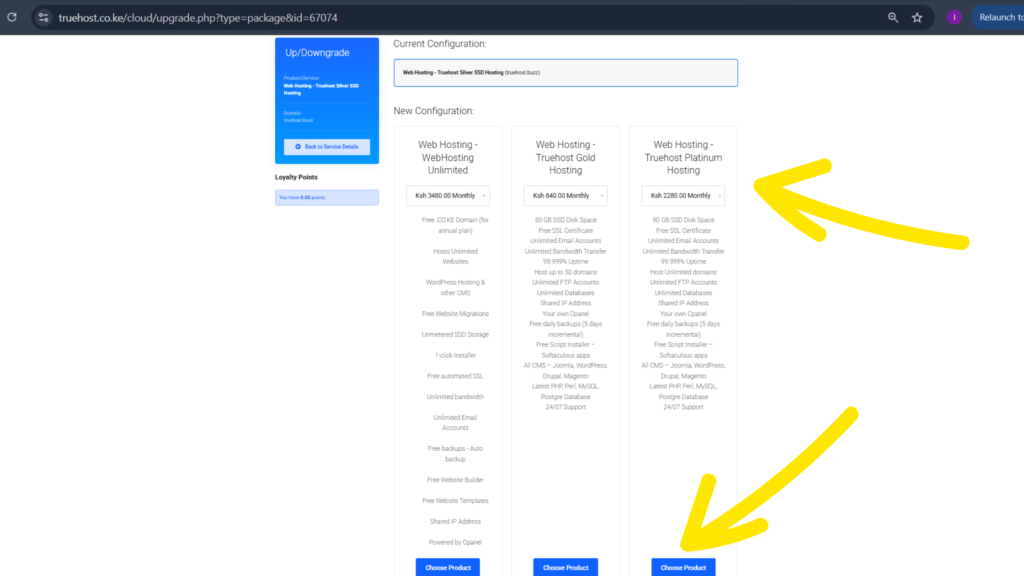
With your desired hosting plan selected, you are now ready to begin the upgrade process. On the left side of your screen, in the Product Detail page, you will see an “Upgrade/Downgrade” button. Click on it and you will see all the available high-tier plans.
This action will bring you into the official upgrade workflow. From here on, you will be in a position to make changes to your hosting resources and plan type. It doesn’t matter if you are moving from a starter shared plan to a higher shared tier, or even switching VPS or Cloud hosting.
Remember that this step is very critical in the process to upgrade your hosting plan, so be sure that you are upgrading the correct service.

Step 4) Choose Your New Plan
So far so good. Now that you have accessed the upgrade section, it is time to choose your new hosting plan. So, what happens next:
- At Truehost, we will display a list of all available upgrade options. These options vary depending on your current hosting plan. For instance, if you are on a shared hosting Bronze plan, you might see the Silver and Gold options.
- Each plan will show its specs. This could be disk space, bandwidth, the number of websites that are supported, email accounts, and other key features.
- The pricing difference between your current plan and the new one will also be calculated automatically. This calculation is prorated, meaning you are only charged the difference based on the remaining time in your current billing cycle.
- Look and assess each plan’s features and pricing carefully then select the one that fits your growing needs.
If you are planning to run more than one website, need more bandwidth, or maybe you expect a major traffic increase soon, it is a good idea to go one step higher than you think you currently need.
Once you have made your selection, click on the “Choose Plan” button to proceed.
Step 5) Complete the Order
With your new plan already selected, you are just a few steps away from finalizing your upgrade.
Here is what to do next:
- Review your selection one more time. Cross check that the plan name, billing cycle and the pricing are all accurate.
- If you have a promo code, this is where you can apply it. The promo code allows you to receive a discount.
- From here, choose your preferred payment method. At Truehost, we support several options such as PayPal, Bank Transfer, Debit/credit card, and even the famous M-Pesa (for Kenya).
- With your new plan selected, you are just a few steps away from finalizing the upgrade.
- Once you have confirmed that everything is looking good, click on the “Proceed to Checkout” button to move to the final upgrade step.
This will trigger Truehost’s system to generate an invoice for the upgrade cost.
Step 6) Finalize the Upgrade
The final step to upgrade your hosting plan is completing the payment and confirming the change.
After submitting your upgrade order:
- The Truehost system will automatically generate an invoice that will be presented to you on your screen.
- The invoice will reflect the prorated amount you owe for upgrading. This amount is calculated based on how much time is left on your current plan and the cost difference between the old and the new packages.
- You can now proceed to make the payment through the option you select.
- Once the payment has been made successfully, the Truehost system will begin processing the upgrade immediately.
More often than not upgrades take only a few minutes to a few hours to apply. Once the process is complete, you will receive a confirmation email.
What Happens After the Upgrade?
Once you have upgraded your hosting plan, here is what you should do next:
- Confirm your plan change: Log in to your Truehost dashboard and check your “Services” page to ensure the new plan details are showing.
- Test your website: Make sure your site is live, fast, and functioning as expected.
- Access new features: If your upgraded plan includes more storage, add-on domains, or email accounts, now is the time to use them.
- Review usage regularly: Use the metrics in your cPanel or hosting dashboard to monitor bandwidth, disk space, and traffic. Staying on top of these stats helps you decide if or when you will need another upgrade in the future.
If something doesn’t seem right, or if your site is having issues post-upgrade, contact our Truehost support team right away via ticket, chat, or phone. Our team is equipped to help you sort things out fast.
Benefits of Upgrading
Now that you have learnt how to upgrade your hosting plan, here is a quick look at why it pays to upgrade your hosting plan at the right time:
- You get improved website speed
- Increased uptime and reliability
- More storage and bandwidth
- Better security features
- Room to scale as your business grows
Through learning how to upgrade your hosting plan properly, you ensure your website performs optimally and meets the needs of your growing audience or customers.
Read Also:
If you are considering an upgrade or just want to better understand how hosting works, you might also find these resources helpful:
- 7 Signs It’s Time to Upgrade Your Hosting Plan: Recognize the red flags before performance drops cost you traffic.
- Mastering Secure cPanel Login: A Step‑by‑Step Guide: Learn how to protect your account and access your server the right way.
- Domain and Hosting Price: Buy Together or Separate? Weigh the pros and cons of bundling your hosting and domain.

Final Thoughts: Let us Grow with You
Could be that your business is expanding, your traffic is spiking, or you are simply ready to unlock more power. Learning how to upgrade your hosting plan is the first step to building something bigger and better.
Here at Truehost, our goal is to grow with you. If you are ever unsure about which path to take, feel free to talk to us. We have helped thousands of customers scale up seamlessly, and you are next.
Let us give your website the performance, speed, and reliability it deserves.
👉 Ready to upgrade? Log into your Truehost Client Area and get started today. We are right here if you need anything.