Web HostingBudget-friendly shared hosting plans
 Domains SearchFrom .com to unique country domains, explore and register extensions worldwide.
 WordPress HostingPower your blog or business with WordPress hosting.
 Email HostingSimple, secure email hosting that helps you stay connected and professional.
 Reseller HostingStart your own hosting business with easy and reliable reseller hosting plans.
 AffiliateJoin our affiliate program and earn commissions every time you bring in new customers.
 cPanel HostingHosting powered by cPanel, the world’s most user-friendly control panel.
 Windows HostingBuilt for Windows applications and websites
 IN Domain PricesDon’t miss out on the best domain deals in India!
 WHOIS LookupFind out who owns a domain name with a quick and easy WHOIS search.
 .Com DomainGet the most trusted domain for worldwide credibility
 All TldsSearch and register domain extensions worldwide.
 VPS HostingPowerful virtual servers. Full root access. Reliable uptime.
 Managed VPS HostingNot a tech expert? Choose our fully managed VPS service.
 Dedicated ServersTake full power and total control of your own physical server.
Last updated on July 5th, 2024 at 11:16 am
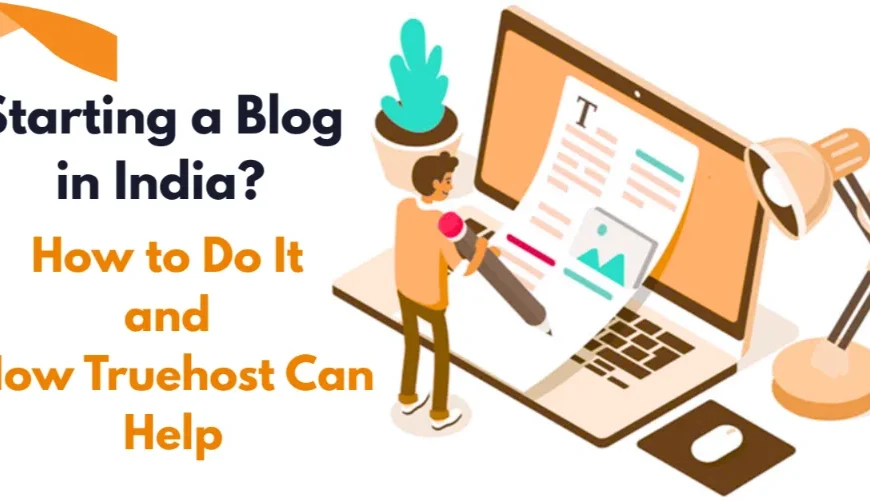
I’m sure that you have seen blogs all over the internet and wondered how they are made. If so, then this article is for you! I will show you exactly how to start a blog in India of your own in just five steps.
And that is not the end.
You will also learn how to make money with your blog in India.
So, if that is something you are looking for, stick to the end because there is a surprise deal for you.
1) Decide on Your Blog Content
This is the first step to start a blog in India.
What do you want to talk about?
There is no need to feel limited here, but keep it relevant to your niche or industry if possible because this will make it easier for people to find you.
The best way to think it through is by thinking about what would be the most interesting post for someone who’s interested in your topic?
Consider topics that are seasonal, new developments on a topic, or anything else that happens often enough so as not to become stale and outdated – this will keep readers coming back!
Create a list of potential posts before starting because once your blog gets going, it can be difficult to come up with ideas.
Keep in mind that too many posts might lead people away from visiting again if they have other things competing for their time and attention.
You want them engaged at all times so give them something good every now and then but try not to overwhelm anyone either!
You don’t need much content to start with – this will come in time.
If you are not sure what to blog about, then think of something that is relevant or interesting for your audience and start there!
Read also:
- How to Select a Niche for the New Blogger in India – 5 Tips!
- How to Blog in India for Profit: The Best Niches and Strategies
- 7 Best Niche for Blogging in India for Beginners
- 10 Best Niches for Blogging in India You Should Copy
2) Find a Domain Name
To start a blog in India and make money, you need a domain name.
This can be done through many different websites. The most popular option is www.Truehost.co.in.
They offer domain names at very affordable prices with lots of attractive features such as free email accounts and site hosting services included in the purchase price.
How to pick the best domain name in India
To pick the best, consider the following;
- Availability – is the domain name available?
- Branding – does it roll off your tongue or are you not sure about how to pronounce it?
- How will people search for this blog with that domain name?
- Who else is using this domain name and what kind of content do they have on their site? This might affect whether people would be interested in visiting yours.
- Length of the domain name – The shorter the better! It is easier for people to remember and it takes up less space on a browser page meaning it displays more quickly
Keep these things in mind when picking a domain!
You don’t want to start out with something difficult because then no one will visit, but you also need to consider quality so keep looking until you find just the right one!
3). Choose a blogging platform
There are many platforms to choose from, but one of the most popular is WordPress.
It is an open-source platform that is designed for blogging and website creation – you can find it at wordpress.org or download it directly from your account with Truehost.co.in (can be installed on our hosting service).
Read also:
- 9 Best Blogging Websites in India
- 5 Best Web Hosting in India for Blogging
- 8 of The Best and Free Blogging Sites in India
4). Get a web hosting account
A hosting account is essential to make your blog live.
There are two options:
You can choose a managed web host like GoDaddy that offers email and site hosting services as part of the package or you can purchase just an FTP (File Transfer Protocol) service from any company for about $14 per month.
Both will have plenty of features but if you are not technical savvy.
Managed hosting is great for beginners because you can get started without having to worry about managing software updates on your own.
If you feel like the cost of managed hosting in India is too much, consider shared hosting.
We have the best wordpress hosting in India, click here now to see our packages.
5). Install WordPress
This is the 5th step when you want to start a blog in India and make money.
WordPress is free and you can install it directly on your cPanel.
Here is a step-by-step guide on how to install wordpress in India.
In a nutshell, here is how the process looks like;
- Once you have your hosting account, log into the cPanel dashboard
- Search for Softaculous, which is an app installer.
- Pick WordPress from the list of apps available and click install
- Perform necessary settings like picking the right domain to install WordPress, giving it a name and description.
- Finally, choose a username and password then click install
Now, that is how to start a blog in India and make money. Here are other steps after installing WP.
6). Choose a theme for your blog site
There are many different themes to choose from, but there is one that you have access to in WordPress called “Twenty Sixteen” which can be accessed by going into the Appearance section of Settings.
There are other options available as well and each will give your blog its own personal look – so take some time deciding on what’s best for you!
Both free and premium ones, but most wordpress themes in India come as freemium, which means you get advanced features if you upgrade.
But for now, the free ones will do.
Steps to install WordPress Theme
There are a few different ways to install a WordPress theme, depending on where you got the theme and your comfort level with using different tools. Here are the most common methods:
1. Installing from the WordPress Theme Directory:
- Log in: Go to your WordPress dashboard.
- Appearance > Themes: Navigate to this section.
- Add New: Click on this button at the top.
- Search or Browse: You can search for a specific theme or browse through categories.
- Preview: Click on any theme to see a preview of how it will look on your site.
- Install: Once you find a theme you like, click the “Install” button.
- Activate: After installation, click “Activate” to make it your live theme.
2. Installing a Theme Using the Upload Method (for Premium or Downloaded Themes):
- Download: Get the theme’s ZIP file from the provider.
- Log in: Access your WordPress dashboard.
- Appearance > Themes: Go to this section.
- Add New: Click on this button.
- Upload Theme: Click on this button at the top.
- Choose File: Select the ZIP file you downloaded.
- Install Now: Click this button.
- Activate: Once uploaded, click “Activate” to use the theme.
3. Installing a Theme via FTP (for Advanced Users):
- FTP Client: You’ll need an FTP client (like FileZilla) to access your website’s files.
- Download: Get the theme’s ZIP file.
- Extract: Unzip the file to get the theme folder.
- Connect: Connect to your website via FTP using your credentials.
- Navigate: Go to the
/wp-content/themes/folder. - Upload: Upload the extracted theme folder to this directory.
- Log in: Access your WordPress dashboard.
- Appearance > Themes: Navigate here.
- Activate: You should see your new theme listed. Click “Activate.”
Important Notes:
- Backups: Before installing any new theme, always make a backup of your website. This way, you can easily revert if something goes wrong.
- Compatibility: Make sure the theme you choose is compatible with your version of WordPress and any plugins you’re using.
- Customization: After installing a theme, you’ll likely want to customize it to fit your branding and content. Most themes have options in the “Appearance > Customize” section of your dashboard.
Things to consider when choosing a wordpress theme in India
Considering the vital role the theme will play in your blogging in India, consider the following when choosing one;
a). Extending the theme
If you want to make some small, customized changes to a theme’s functionality or appearance without starting from scratch, then installing an extension is your best bet.
This can be done by clicking on “add new” and searching for extensions in the wordpress.org directory.
They are also available right inside of the WordPress dashboard when you click on “addons.”
b). Creating a child theme
It is possible that there are modifications that need to be made specifically for your website, so creating what’s called a ‘child’ or ‘sub-theme might be necessary.
Create one by downloading any existing template as its parent (this will become your child) and following these steps: go into edit mode; find the “style.css” file, and add your edits to this file, then save it (repeat for any other files you want to edit).
Afterward, there will be a new option in the wordpress dashboard called child themes that allows users access to all of their customizations without having to go back into code every time they need something changed.
c). Free theme or premium?
Many people are hesitant about paying for templates because most free ones work just as well, if not better than paid options.
While this is true on some level, sometimes quality does matter–just look at ColdFusion vs java!
One thing’s for sure: don’t stay stuck with an outdated template simply because it was free and now you’re too afraid to make the switch.
d). Theme preview
Before you purchase a wordpress theme, it is wise to take advantage of its demo site and look at all of the features that come with it so that you can get an idea of how they’ll translate on your own website.
This will help to avoid any surprises after installation!
e). Starting from scratch?
If none of these options sound appealing or are not possible because there’s too much customization required, then starting from scratch might be your best bet.
This means designing every aspect from layouts down to buttons yourself–which may seem daunting but thankfully there are plenty of resources available online (including tutorials) that can offer guidance when needed!
Read also:
7). Plugins & Widgets
This is another step to start a blog in India and make money.
These allow you to add functionality or features to your websites such as adding social media buttons, analytics tools, and more.
One plugin that is very popular with bloggers is Yoast SEO because it makes sure everything about the content on a page is optimized for better search engine rankings.
It helps to use a plugin to make sure the content on your site is easy for search engines to find and index.
Talking of plugins, here are some must-haves.
Steps to install WordPress Plugin
Just like a theme, there are a few different ways to install a WordPress plugin, depending on whether it’s a free plugin from the WordPress repository, a premium plugin you purchased, or a custom plugin.
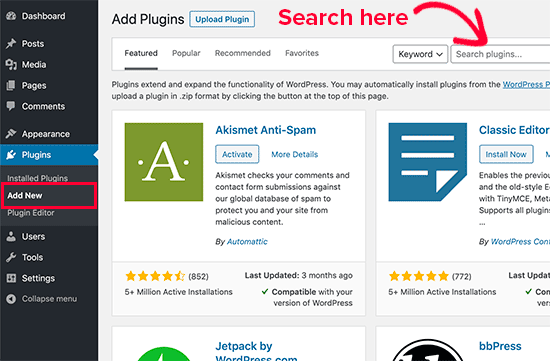
1. Installing from the WordPress Plugin Directory (Free Plugins):
- Log in: Go to your WordPress dashboard.
- Plugins > Add New: Navigate to this section.
- Search: Type the name of the plugin you want to install in the search bar.
- Install: When you find the plugin, click the “Install Now” button.
- Activate: After the installation is complete, click the “Activate” button to start using the plugin.
2. Installing a Premium Plugin:
- Download: Download the plugin’s ZIP file from the provider.
- Log in: Access your WordPress dashboard.
- Plugins > Add New: Go to this section.
- Upload Plugin: Click on this button at the top.
- Choose File: Select the ZIP file you downloaded.
- Install Now: Click this button.
- Activate: Once uploaded, click “Activate” to use the plugin.
3. Installing a Plugin via FTP (Advanced Users):
- FTP Client: You’ll need an FTP client (like FileZilla) to access your website’s files.
- Download: Get the plugin’s ZIP file.
- Extract: Unzip the file to get the plugin folder.
- Connect: Connect to your website via FTP using your credentials.
- Navigate: Go to the
/wp-content/plugins/folder. - Upload: Upload the extracted plugin folder to this directory.
- Log in: Access your WordPress dashboard.
- Plugins: You should see your new plugin listed. Click “Activate.”
Some Important Notes:
- Backups: Before installing any new plugin, it’s always a good practice to make a backup of your website. This way, you can easily revert back if something goes wrong.
- Compatibility: Make sure the plugin you choose is compatible with your version of WordPress and any other plugins you’re using.
- Configuration: After installing and activating a plugin, you’ll likely need to configure its settings to fit your needs. Most plugins have a settings page in the WordPress dashboard.
Must-have wordpress plugins in India
To start a blog in India and make money, you need these plugins;
Yoast SEO
This plugin is one of the most popular wordpress plugins and for good reason.
It helps you optimize your website content to rank higher in search engines such as Google, Bing, Yahoo! etc.
Read also: 8 SEO Plugins You Should Install on Your WordPress Blog in India
WordPress Backup Plugin
Protecting your site against crashes can be a daunting task but if something happens at least it has been backed up so that you can easily restore the site without losing data or having to start over from scratch.
This simple yet powerful plugin allows you to have peace of mind when running important changes on your site.
Jetpack
It is not an essential plugin but since we are talking about wordpress plugins in India that have made life easier, Jetpacks features such as backup tools and site visitor counter help to make the management of your blog a whole lot less stressful.
The only downside is that you need premium hosting in order to use this feature so if you are planning on switching hosts then be mindful of that fact!
Google XML Sitemaps
Another one of the wordpress plugins that help to start a blog in India and make money smoothly, this plugin is an easy way for you to upload a sitemap that will be used by search engines in order to index all of your posts and pages.
This speeds up loading times and increases visibility on SERPs.
Google Analytics Dashboard
This plugin is a great tool to monitor the traffic on your website.
You can see where visitors come from, how they got there, what their search terms were etc so that you have some insight into how well your content is performing and what features might need tweaking in order for more people to find it.
WP Hide Post
This plugin lets you hide certain posts based on the date (e.g. those posted in January 2017) as well as with specific keywords, tags, and categories to help keep your blog looking neat and tidy while still keeping everything available at the click of a button – perfect for when you are uploading older content but want some items to remain hidden until they’re ready to be shown off to the world!
You may not need it right away, but trust me, you will soon!
8). Create a Blog Post
This is the last step to start a blog in India and make money.
This step will vary depending on which blog platform you have chosen.
In this example, we’ll go over how to write a post using WordPress as our platform since I’m assuming that since you’re reading this article, then WordPress would be best suited for what you want in terms of design and features too!
So let’s get started…
First off create a new post by clicking “Add New” and then you’ll fill in the title, content for your new post.
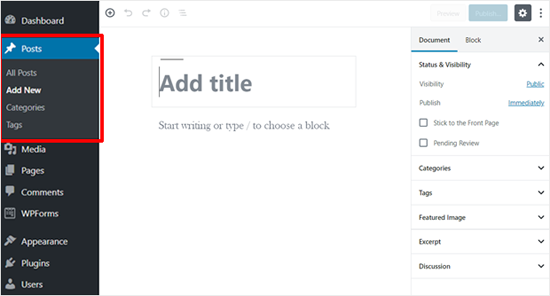
Next is to choose a category so that it’s easier for people to find specific posts on topics they’re interested in.
You can also create custom categories as well if there isn’t one that works best!
We recommend sticking with tags or labels (keywords) when possible because these make searching much more efficient and will help readers find what they are looking for faster.
You want to write at least 400 words before publishing this first blog post which means you should spend some time editing – but don’t worry, WordPress has an easy way of previewing how your blog would look once published by clicking “Show Preview.”
This makes sure everything looks great before you publish it!
Now that you have learned how to start a log in India, let me show you how to make money with it.
Read also:
- How to Write an Engaging Blog Post in India (Fast)
- 15 Must-Have Content Creation Tools for Bloggers in India
How to start a blog for free in India
You don’t really need the money to start a blog in India, and I am going to show you how.
To start a blog for free in India, you can use free blogging platforms like WordPress.com, Blogger, or Medium. Here’s a simplified step-by-step guide:
- Choose a Platform:
- WordPress.com: Offers a good balance of ease of use and customization options.
- Blogger: Very simple to use, suitable for beginners.
- Medium: Focuses on content and community, less customization available.
- Create an Account:
Sign up for a free account on your chosen platform using your email address.
- Choose a Blog Name and URL:
- Select a name that reflects your blog’s niche or topic.
- The URL will be your blog’s address on the internet (e.g., [invalid URL removed]).
- Select a Theme and Customize:
- Browse through the available free themes and choose one that suits your style.
- Customize the theme’s colors, fonts, and layout to personalize your blog.
- Start Writing and Publishing Posts:
- Create engaging content that resonates with your target audience.
- Use images, videos, and other multimedia to make your posts visually appealing.
- Promote Your Blog:
- Share your blog posts on social media platforms like Facebook, Twitter, and Instagram.
- Engage with other bloggers and communities in your niche.
Tips:
- Choose a Niche: Focusing on a specific topic helps you attract a targeted audience.
- Write Regularly: Consistent posting keeps your readers engaged and coming back for more.
- Learn SEO Basics: Optimizing your posts for search engines can help people find your blog.
- Interact with Readers: Respond to comments and feedback to build a community around your blog.
But if you can start a blog for free in India, how comes everyone isn’t doing it?
Well, see the next section.
Limitations of Free Blogging Platforms:
- Limited Customization: You’ll have fewer options to customize your blog’s design and functionality.
- Advertisements: Some platforms may display ads on your blog.
- Limited Monetization Options: It might be harder to earn money from your blog.
If you decide to take your blog more seriously and want more control, you can later upgrade to a paid plan or switch to a self-hosted WordPress blog where you have your own domain name and more flexibility.
Proven ways to make money with your blog in India
a). Offer a membership service for blog posts to be delivered by email
This service could offer a monthly or yearly subscription to get the latest articles sent directly to their inbox.
The price point should be something that is affordable and on par with what other similar services are charging for content delivery, but not so much as it may scare people away who just want to explore your blog posts without committing too heavily.
b). Affiliate marketing
It is the easiest way to make money blogging.
You can find a company that will pay you commission on sales made through your blog.
c). Amazon Associates
Affiliate marketing with Amazon is another great way to make money blogging, and the income potential from this program is high.
You earn commissions of about four percent when visitors buy products you recommend.
d). Sell ads
If you are successful in building an engaged audience for your blog, it’s possible to sell ad space directly on your site or auction off advertising spots on eBay at a premium price.
This method has been used by many blogs to generate revenue because advertisers may feel they’ll get more bang for their buck in attracting customers than other forms of advertising like print media or radio/television advertisements, but some bloggers have found that it’s not a reliable source of income.
e). Sell your own product
If you are able to develop an audience with enough followers, then you can sell products that are related to what they like or need on the blog itself.
But this option is difficult because most bloggers don’t have the design skills necessary and also find themselves competing against bigger businesses in their category who may be better equipped.
f). Sponsorships/Advertising Sales
If your site has high traffic numbers and unique content such as recipes for foodies, specific health information, or parenting advice sponsored posts from companies will help bring money into your bank account.
But again this method doesn’t always work well unless one already has a large following.
And that is how to start a blog in India and make money fast!
Read also:
- How Much Money Can 1,000 Views on a Blog in India Generate?
- 10 Easy Ways to Make Money Blogging in India
- How to Make Money from Blogging in India: 5 Ways That Work
How much does it cost to start a blog in India?
The cost of starting a blog in India can vary depending on your needs and preferences. Here’s a breakdown of the typical expenses:
Essential Costs:
- Domain Name: ₹600-₹700 per year (approximately $7-$8 USD)
- Web Hosting: ₹6,000 per year (approximately $72 USD) for the first year. Prices can go down with longer-term plans or discounts.
Optional Costs:
- Premium Theme: ₹2,000-₹10,000 (approximately $24-$120 USD) or more, depending on the features and complexity.
- Plugins: Prices vary, with some being free and others costing a few hundred to a few thousand rupees.
- Content Creation: If you outsource writing or design, costs will depend on the quality and length of content.
- Marketing: This can range from free (social media) to thousands of rupees if you use paid advertising or services.
Free Options:
- Free Blogging Platforms: Platforms like WordPress.com, Blogger, or Medium are free to use but have limitations on customization and monetization options.
Some Additional Costs to Consider:
- Internet Connection: If you don’t already have one, consider the monthly cost of internet access.
- Equipment: You’ll likely need a computer or laptop, and potentially a smartphone for managing your blog on the go.
You can start a basic blog in India for as low as ₹700 per month (approximately $8.50 USD). However, if you want a more professional setup with premium themes, plugins, and marketing, costs can increase.
Tips for Saving Money:
- Start with a shared hosting plan: These are the most affordable options.
- Look for discounts and coupons: Many hosting providers offer deals, especially for new customers.
- Use free themes and plugins initially: You can always upgrade later as your blog grows.
- Create your own content: If you have the skills, writing and designing your content can save you money.
- Utilize free marketing channels: Social media, forums, and communities can help you promote your blog without spending money.
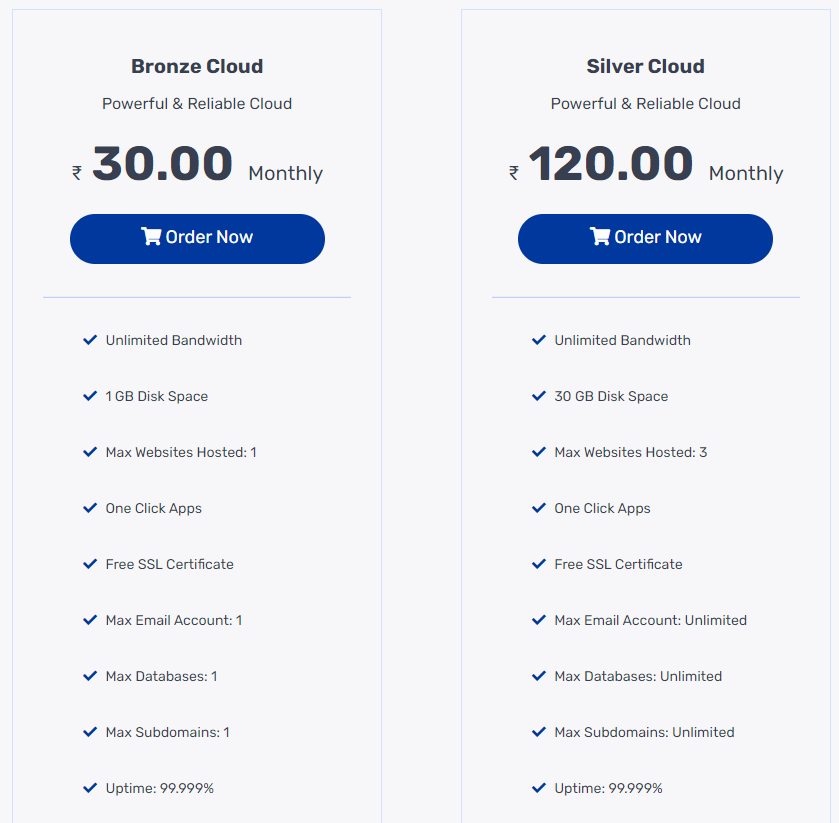
Web hosting offer just for you
How would you like to host up to 3 websites under one account, get unlimited bandwidth, free SSL certificate… for just ₹120 per month?
Read also: